Bittersweet Birthday DEMO
HowTo: A Simple Dialogue System in Godot
Sup y'all, long time no see! Our last devlog seems to have sparked quite a lot of interest in how we've built our game, so we though why not give it another go?
Meet: The Dialogue System!
Let's face it, outside of combat and gameplay elements, most of the heart and soul that we deliver on our games is delivered to the players via unique and interesting conversations with the inhabitants of our games.
From funny conversations: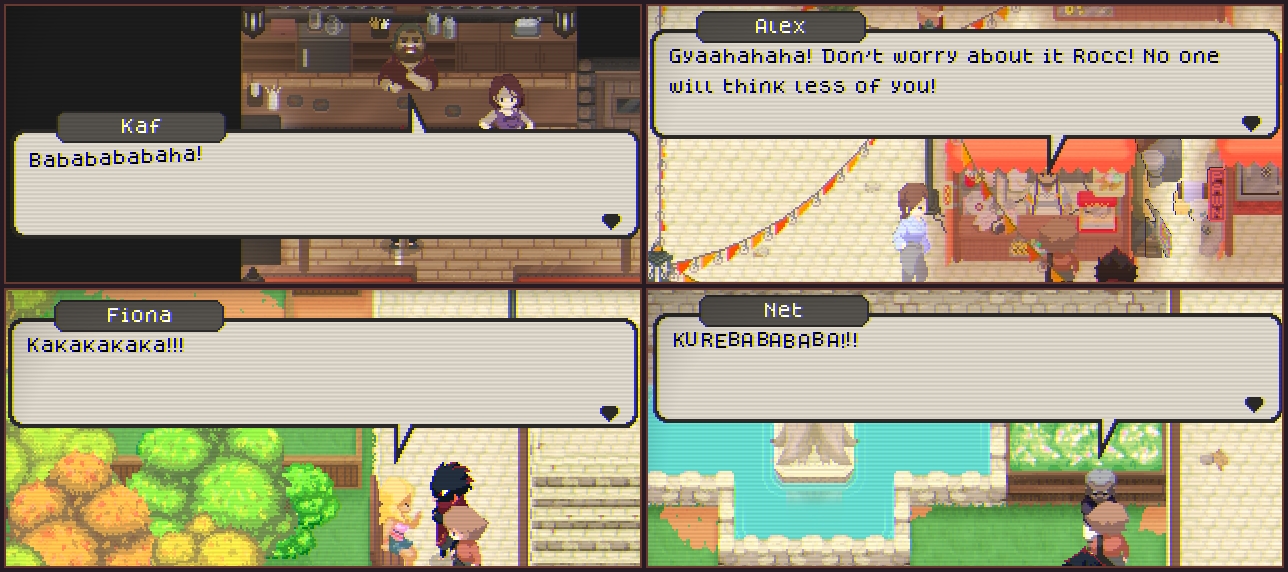
To heartwarming ones:
And, uhh...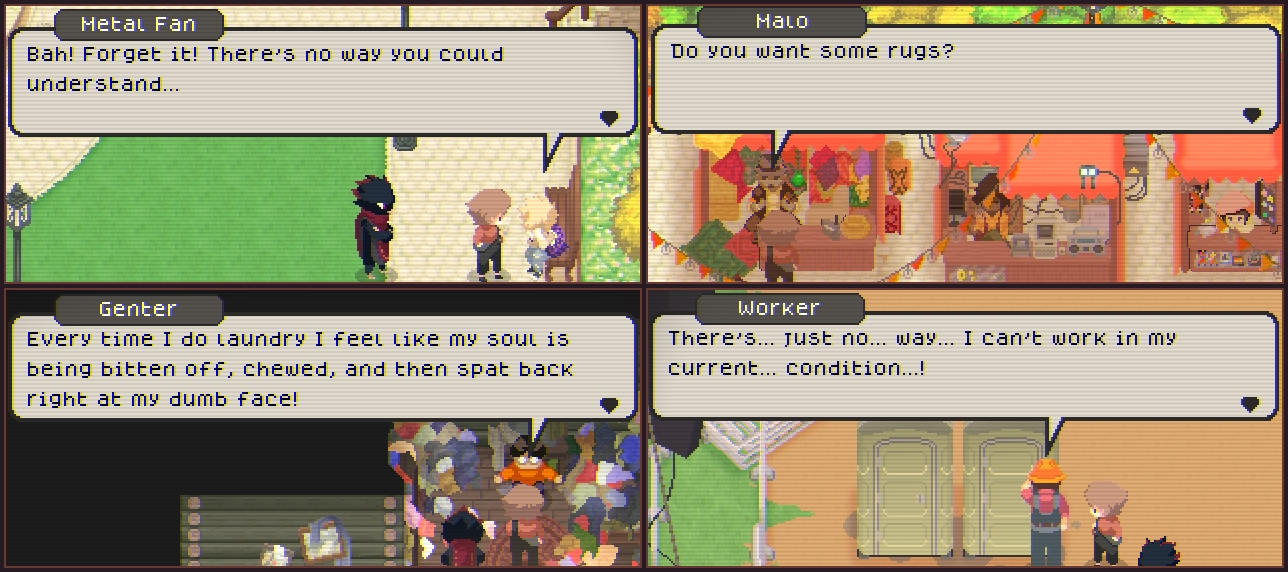
Lets just say, special ones...
They all add a bit of magic to what we're doing.
On the technical VS creative side of things
There are two important aspects that we must take into account when building dialogues for our game:
- "what" we want them to say
- "how" we can deliver what they are saying (the underlying system)
Honestly, the "what" part of this equation is VEEEEERY subjective, and it's something that will be completely different from game to game, so we're going to focus on the "how" aspect for the most part. What I want to say is, we're gonna build the ✨s y s t e m✨ in this post, what you will make your game say with it is up to you 😎.
With that out of the way, let's begin shall we?
What we'll be building
I'm gonna be honest here, there's no way that we can cover every single functionality of our dialogue system in just one post, and most of it is custom-tailored to our game, so it probably won't apply to what you are doing. Instead of explaining everything, I'm gonna reduce the scope and just tackle the following functionalities:
- Per-letter typing, to simulate that they are actually "speaking" (text simply appearing is kinda boring)
- Controlled pauses in the middle of the conversation, to simulate actual language inflections.
- Leave our text open to styles via BBCode, and make the rest of the system behave nicely with it.
- Multiple conversations! since like, just a single paragraph is not a real conversation now, is it?
The end result of what we'll build will be a screen with 3 buttons, each one will trigger one conversation like this:
Geese are messed up, man...
Before we start
A brief disclaimer before we get started:
- I will be using static typing in GDScript.
- This project uses the concept of signals extensively, so you should give it a look if you are not familiar with it.
- I'll be using some string manipulation logic, mainly regular expressions. You actually don't actually need to know too much on how to create them to use this guide, just giving you a heads up that you are gonna see weird and messed up string patterns like this:
({p=\\d([.]\\d+)?[}])
YOU HAVE BEEN WARNED Regular expressions are your friends, there's nothing to be afraid of.
By the way, while this tutorial is specifically made for Godot, it's based on several high level development concepts that should be applicable to any platform!
Since source code is a bit difficult to read in itch, I've decided to use images instead of actual code for my snippets. But don't worry, if you want to see the actual source code for the example (for example, to copy some or all of the snippet), you can still click on the image, and it should take you directly to a gist with that snippet's content, for example:

Clicking on that image should take you here. Keep in mind that these are incomplete code snippets, and will mostly be used to illustrate a specific section of this tutorial.
You can also check out the Github Repo for this project, which contains all the resources used here as well as the complete source code for the project.
Last (but not least), I want to do a small and shameless plug: we're launching our INDIEGOGO PRE-LAUNCH PAGE!!!! Please be sure to check it out here if you find the game or this article interesting.

Step 1: The Dialogue node
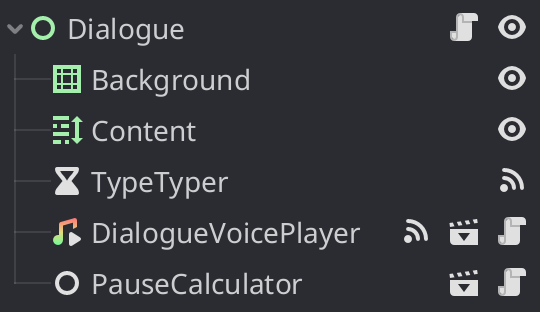
Let's start by creating a control node called "Dialogue.gd" with the following structure:
- A NinePatchRect for the background
- A RichTextLabel for the content
- A Timer, which we'll use to simulate the "typing" logic.
Note: while we could use a plain old regular Label for our content, we would be missing out on quite a lot of styling capabilities that Godot offers via bbcode, which basically allows us to spice our text like this:


You can find more information on how to use this in the BBCode documentation, and the used code was the following:
[color=#ff0000]Hi[/color] [wave]I was generated[/wave] for the [rainbow]dialogue[/rainbow] system test for the godot game [shake rate=20 level=10]engine[/shake]
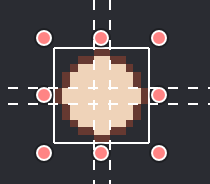
If you want to use the same style that I'm using for the example, you can find the texture I'm using here, the font is Roboto size 32, and the NinePatchRect is configured with that background image like this:
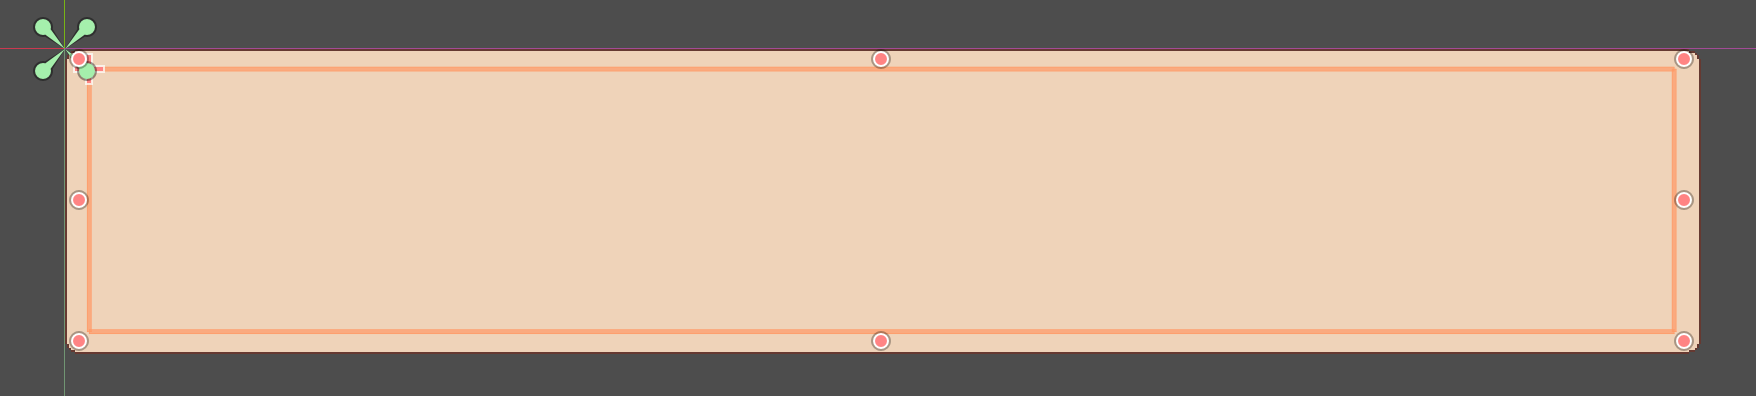
The Node itself will look like this in the preview, considering that it has a size of 798x149, and the rich text label will have a size of 773x128 and be slightly offsetted to simulate a padding, this gives us 3 lines to type our text per "conversation step":
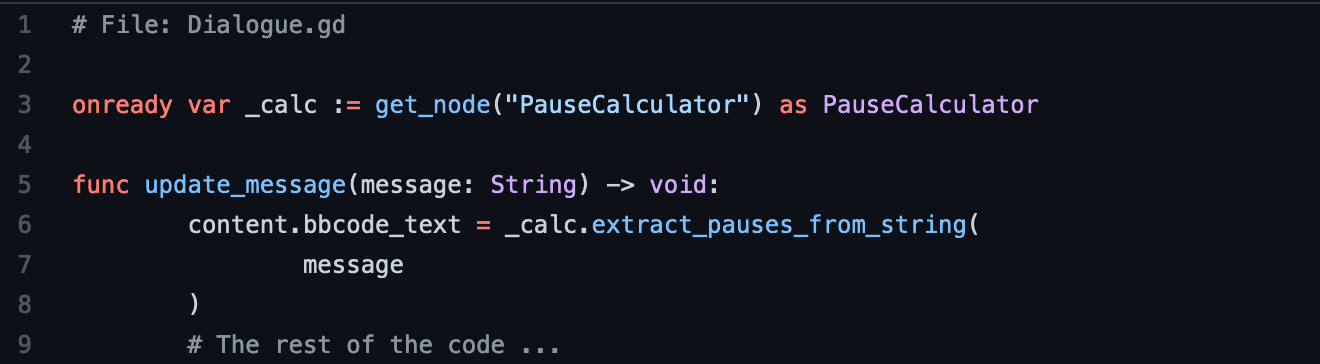
We're going to attach a script to this node with the following code:
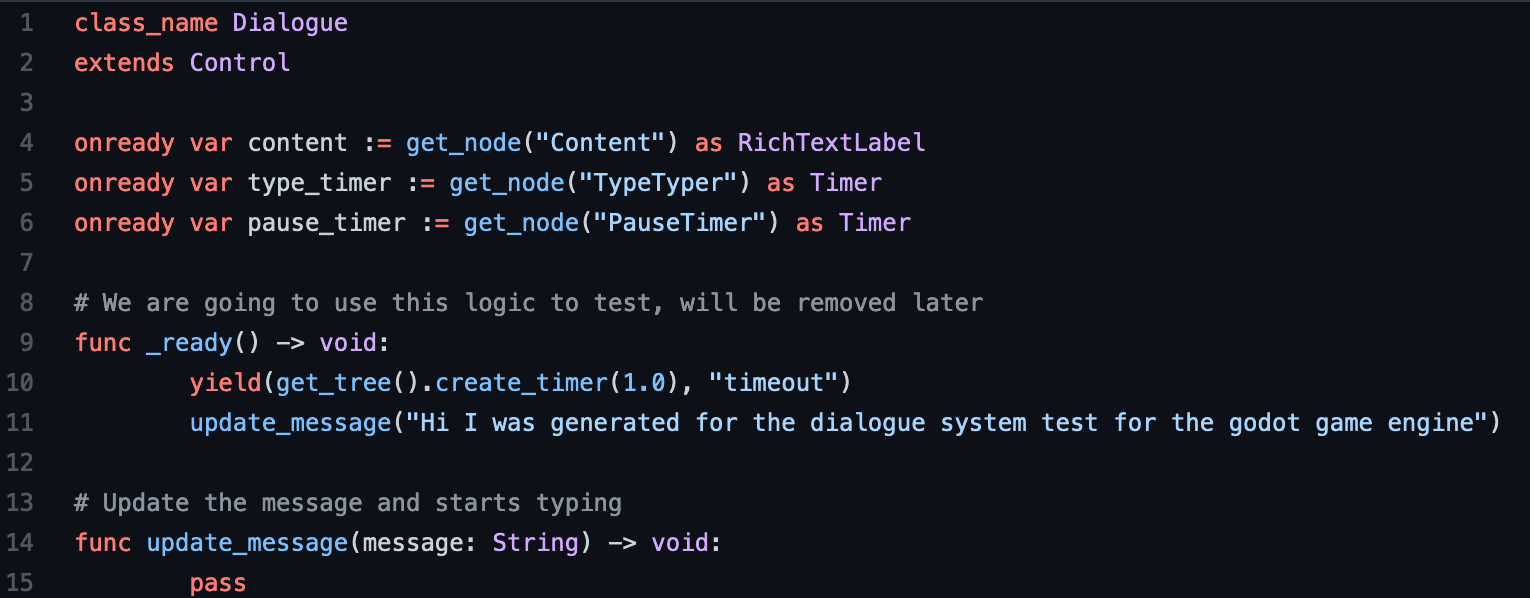
The "update_message()" method will be used to update what we're gonna type (we'll fill in this function later), and what we have defined in the "_ready()" method a simple message that will fire the typing logic after a small delay, just so that we can run the standalone scene while we're building the node (we'll delete it later).
Note: don't worry too much about that yield call, the gist of it is that the "update_message()" method will be called after 1 second. If you want to expand more on what it does, you could read more about the yield declaration, and about the coroutine concept itself (It helps me a lot to see the yield keyword as it meaning await, like "wait for this to finish before continuing").
Anyways, running this as a standalone scene won't do anything yet, so let's populate that "update_message()" method with the following:
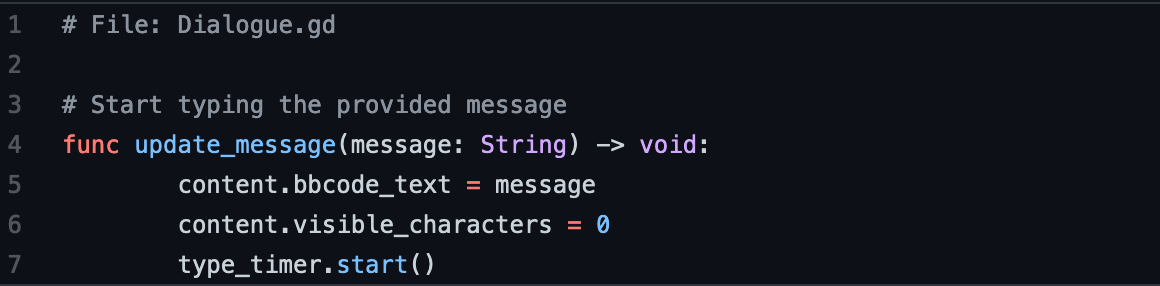
Note that we set the message to the "bbcode_text" property, not to the "text" one. Next, we're going to connect the timer's "timeout" signal to the following method:
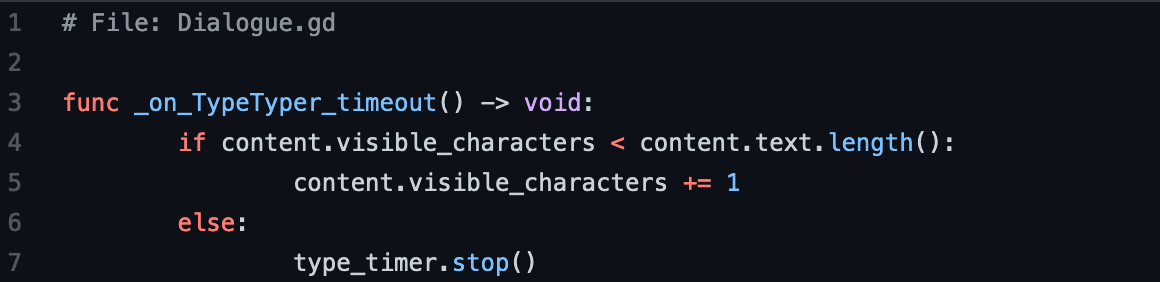
Quick refresher on labels/rich text labels: the "visible_character" property will hide any character whose index is greater than it, greatly simplifying the "typing" behavior:

This callback is basically displaying the "next" character every time the timer finishes, until the message is fully visible, and to achieve this we'll be setting the following values for the timer's exported properties:
| Wait Time | 0.04 |
| One Shot | false |
| Autostart | false |
I know, that 0.04 seems rather...extreme, but I actually think that the result looks quite nice! Running it as a standalone scene should look like this:

The "Wait Time" will determine the typing speed, increase it to make the text appear slower.
Adding the voice
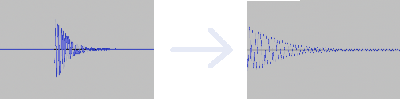
We are going to be using the "blob" sound effect found here, just with a small modification where we remove the initial silence:
And for our first approach, let's play the sound for every letter typed.
Start by adding an AudioStreamPlayer to the scene, assigning it to a "voice_player" variable and calling "play" every time a new character is revealed:

Play the scene aaand...
Perfect!...for a machine gun 😅.
OK that doesn't sound quite right for what we want so instead, we are going to follow this logic:
- Start the voice player when the typing starts
- Loop the voice, using the audio clip duration as the loop interval
- Stop playing as soon as the last character is displayed.
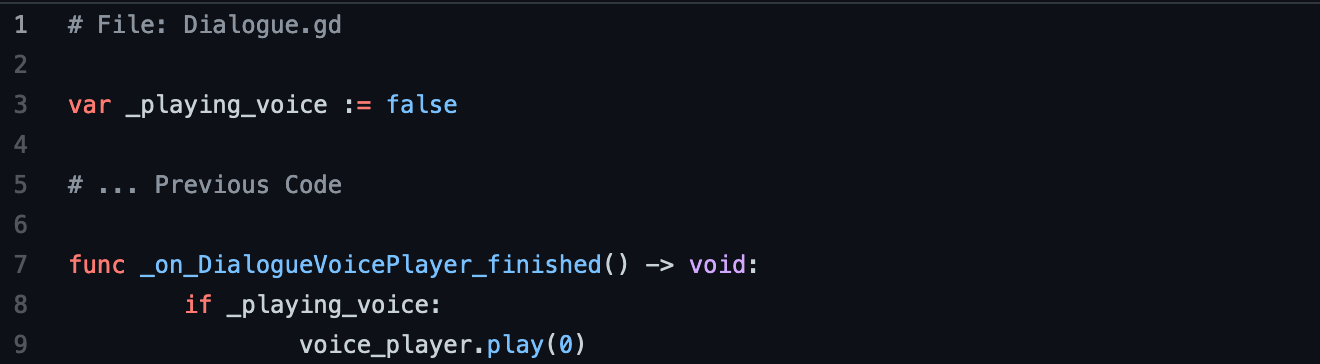
First, add a "_playing_voice" boolean variable to the script, which we will use to re-fire the audio clip (Note: this can also be done by altering the resource's import flags and setting the "loop" property to "true", but I personally prefer to have this logic managed by the code as it's a bit clearer on WHY it is looping).
After this, we're gonna connect the player's "finished" signal to the following method:
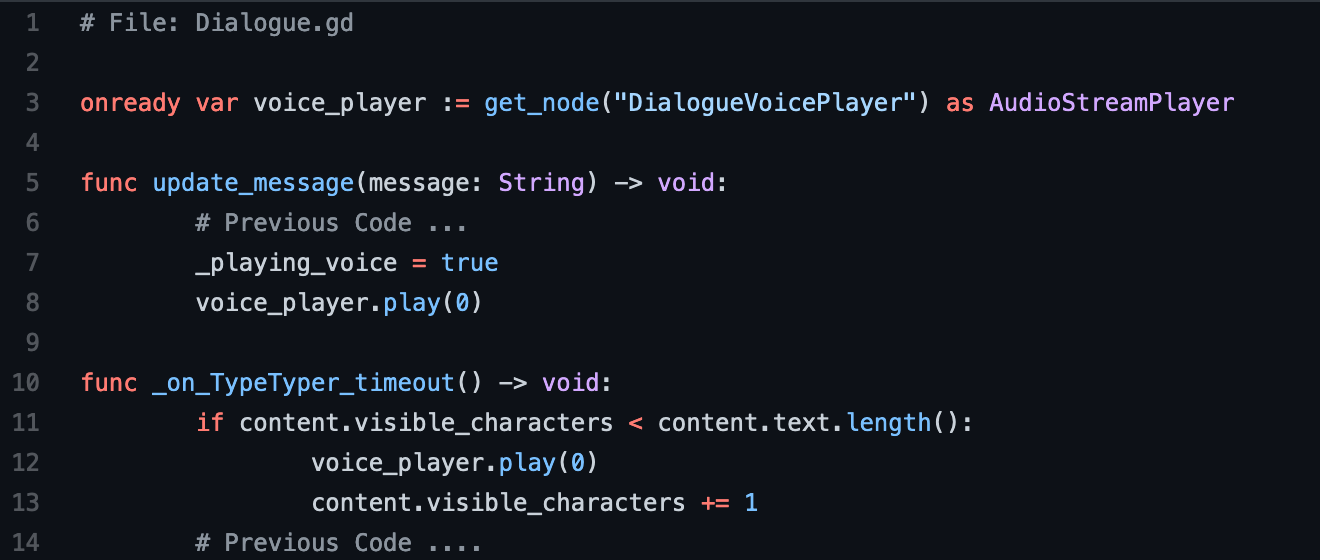
And finally: we're gonna add these lines of code to the bottom of our "update_message" method (remember to also remove the voice_player.play(0) call from the timeout method, otherwise the machine gun will return):

Play it and...
Much better!
Finally, we want to feel like we are not talking to a robot (I mean we kind of are but, that's not the point!!!), so we're gonna apply a little variation on each "blob", just to mimic different word sounds. To do this, we're simply going to add a new script to our AudioStreamPlayer with the following code:
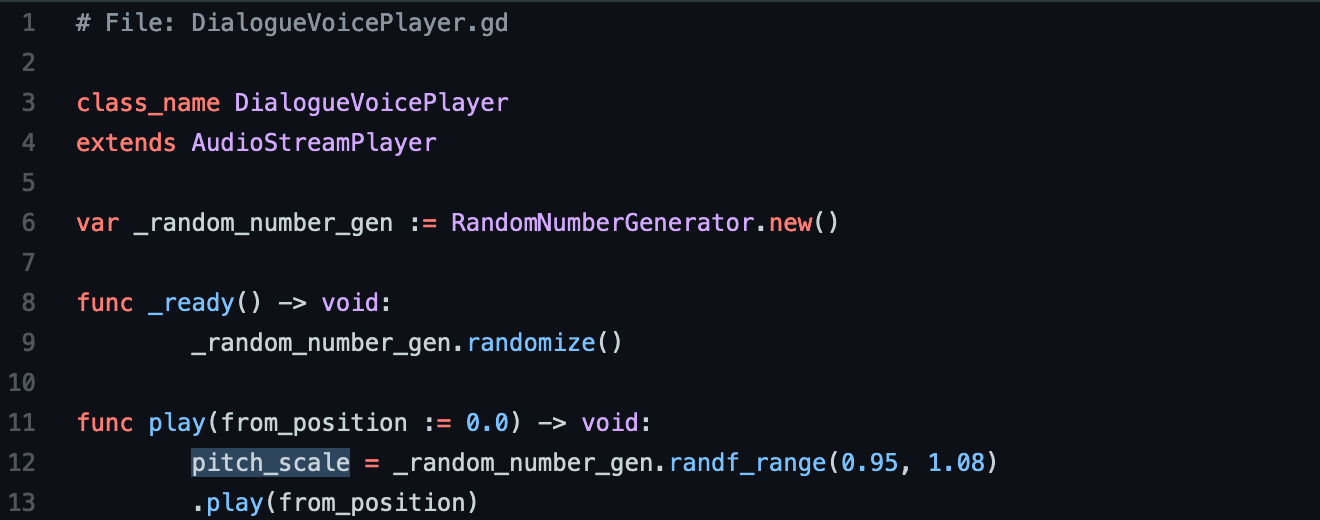
What we are doing here is that for every "play" we call, the voice's "pitch" will vary between 95% and 108% of the original value (and about that RandomNumberGenerator, you can find more info here, but for now just keep in mind that we want to generate a random number between 0.95 and 1.08).
With all these changes: this is the result we are left with:
Nice
Step 2: Pauses
Now, let's implement something that allows us to modify the pause behavior like this:

Here I want to introduce a concept that we use extensively on our dialogues: custom tags. These are NOT custom bbcode tags, which are mainly used to modify how godot renders the text inside the rich text label, rather, they are a custom tag format that we define that allows us to modify how the node types the content.
I'm gonna demonstrate how we use them, but keep in mind that you can define any pattern you want, as long as it doesn't mess with the text you are typing or that they don't overwrite with the bbcode standard.
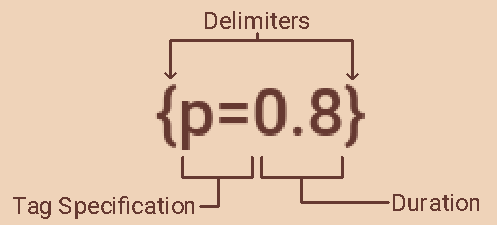
We currently use this format: "{tag=param}" to specify custom tags, and specifically for pauses we're gonna use {p=number}, where the "number" is the amount of time that the typing logic will be paused for.
With that said, the text shown in the gif renders with this string:
Howdy!{p=0.5} I was generated for the dialogue system test...{p=0.5} for the godot game engine!
Notice the two {p=0.5} definitions in that string, is what tells the typing service to stop for a set time at that position. (Wait 0.5 seconds after typing "Howdy!", and another 0.5 seconds after "test...").
But I mean, if you just plug that into the "update_message" method, the {p=%f} tags will just be printed without any special treatment, so we need to add some additional logic to actually parse them. To achieve this, I'll divide the explanation in two parts:
- Detecting and extracting the pauses from the string
- Actually forcing the dialogue to stop/resume typing
Heads up, from here on I'll refer to these pause tags by writing {p=%f} to identify the general pattern
Extracting pauses
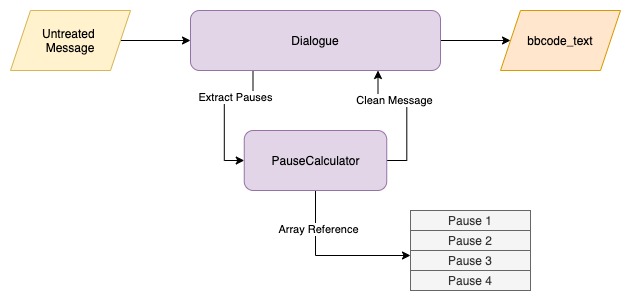
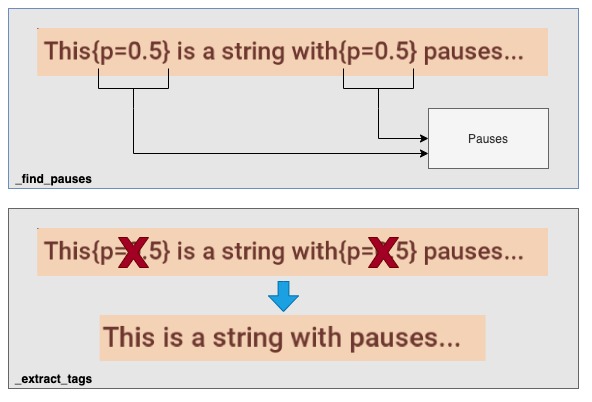
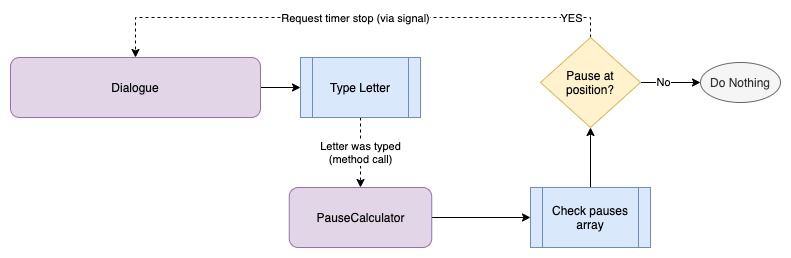
Ok so our main objectives here are cleaning any custom tags we find on our string, and keeping a reference to the pause's positions and durations found inside the string. All of this will be encapsulated inside a node that I'm gonna name "PauseCalculator". A quick graphical overview of the process could be shown as this:
Create a new Node inside a scene and add this code inside:

Inside this class we can see that we have some props and methods, which are empty for now but they will have these responsibilities:
- The "_pauses" array will hold a reference to each found pause inside the string, alongside its duration and position on the message
- The "_find_pauses()" method will actually find these pause tags inside the source string, remove them and register them on the array
- The "_extract_tags()" method will clean all of our custom tags, and return the string that we must pass to the bbcode_text property on the dialogue.
And we're gonna hook it up inside our Dialogue scene. Instance it, add a reference to it and perform the following changes to "update_message":
Now, instead of just assigning the bbcode directly, we first process it through the "extract_pauses_from_string()" method, and assign the result to the property. Note that running it right now will not do anything differently, as that extraction method is just returning its input for now (don't worry, we'll change that soon).
So, much, regular, expressions....
The best way to search for patters inside a string is using regular expressions, which godot provides a powerful API via the RegEx class.
Now, explaining the topic of regular expressions is a WHOLE can of worms, so I'm gonna cut to the chase and straight up tell you what patterns we are using with what we've defined so far so, if you want to expand a bit more on that topic, you can get started here
To detect pauses, we use the following regular expression definition inside our PauseCalculator script:
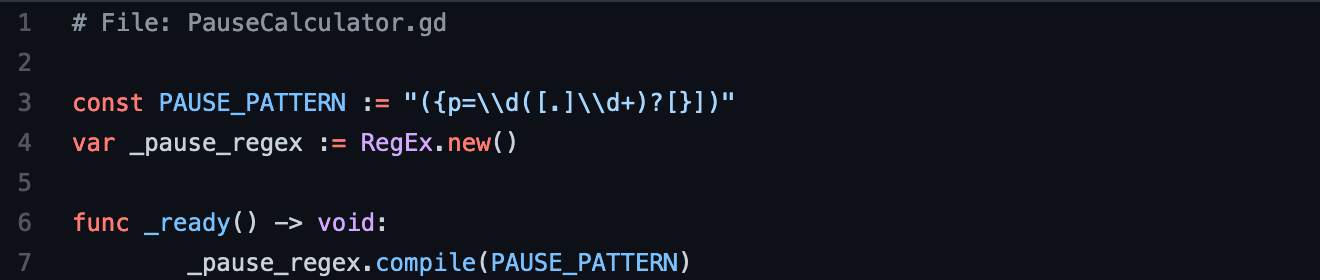
Don't worry too much about that pattern, just know that it will detect {p=%f} patterns inside a string. Also take note of the double backslashes, these are not 100% standard in regexes patterns, as the regex pattern would actually be something like this in other programming languages:
({p=\d([.]\d+)?[}])
However, those languages normally treat regex patterns as a primitive type, and since godot initializes regular expressions with patterns defined inside a string, we must actually escape the backslash character, otherwise the framework will just detect it as a line break.
Ok, let's modify our _find_pauses and extract_tags method with this logic:
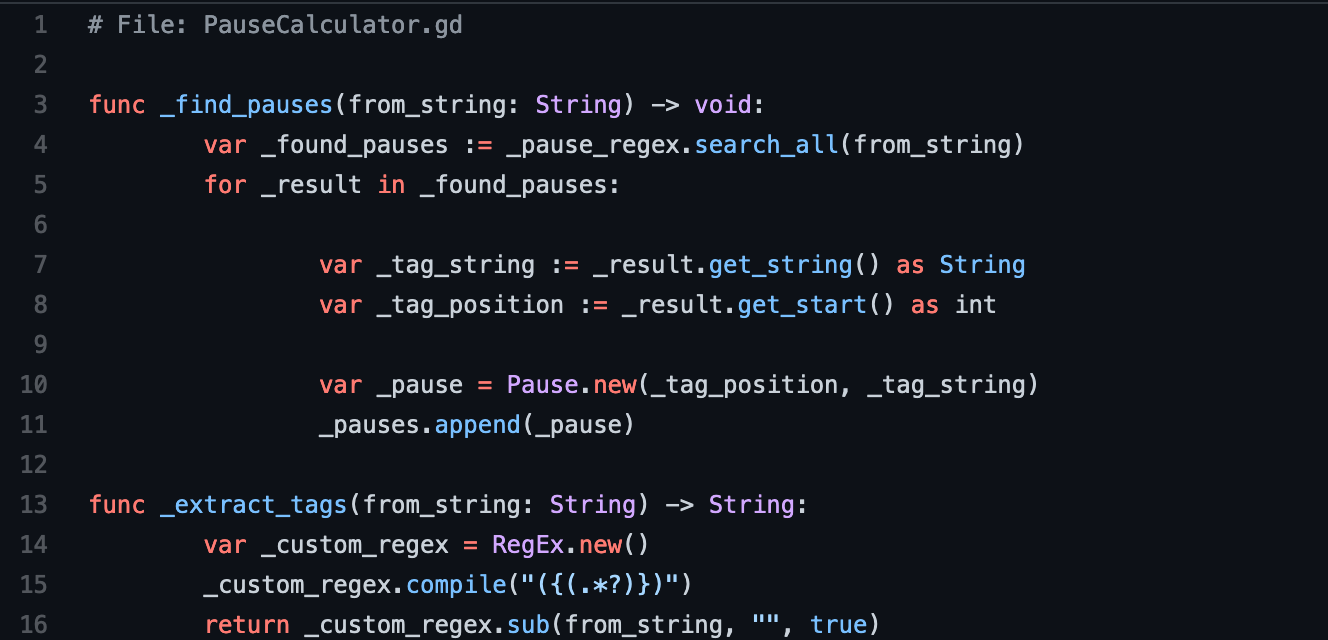
A short summary of what's happening on "_find_pauses":
- Search for all string snippets that match what we defined in _pause_regex inside the source string with the "search_all" method, which will return us an array of ReExMatch instances (basically, objects containing what it found).
- Extract the found string with "result.get_string()"
- Extract the found position with "result.get_position()"
- Create a new Pause class instance (more on that in a bit), and register it to the _pauses array.
And on "_extract_tags":
- We create a custom regex that finds anything surrounded by curly braces (that's how we'll identify our tags)
- Call the sub method, which replaces (or I guess, substitutes based on the name) all matches from the provided string (first parameter), to what you provide as a second argument (an empty string, effectively deleting it). The third parameter tells the method to replace every single occurance, instead of just the first one.
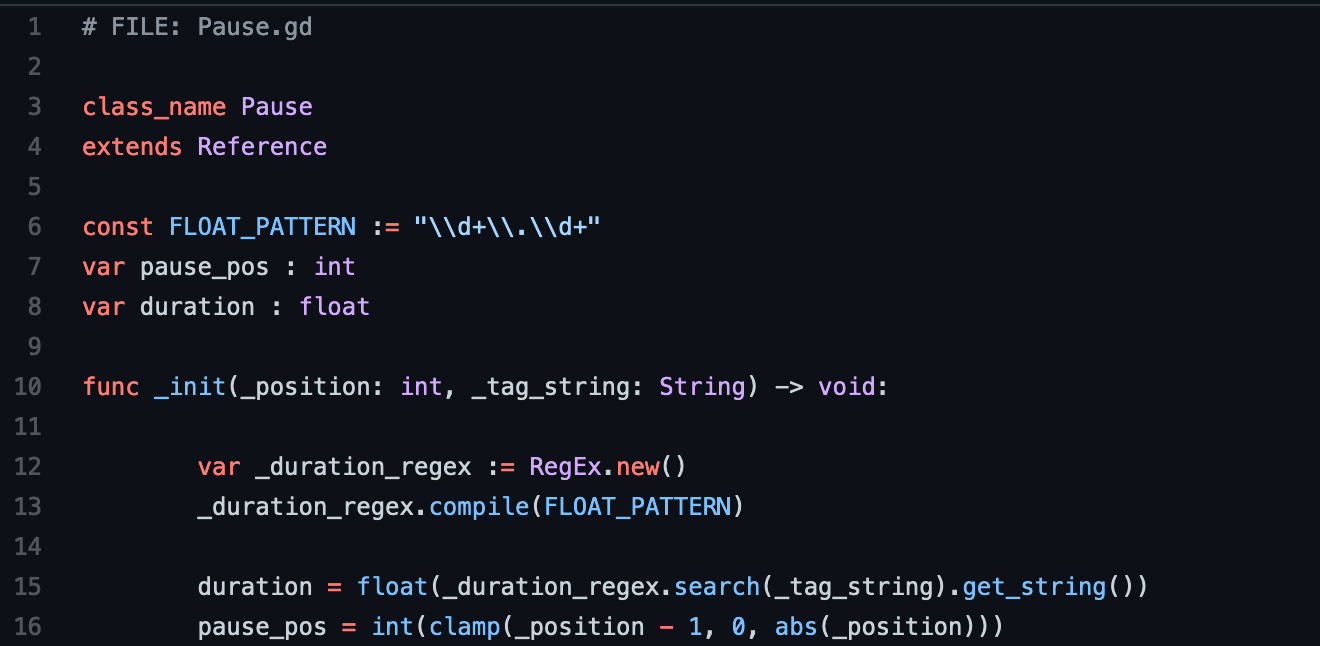
This is the internal structure of that Pause class (I like to save data structure classes in their own .gd as well):
Oh great, another regular expression!
The two important things to keep in mind here are:
- That _duration_regex will mainly allow us to extract the "0.5" from the "{p=0.5}" string, which is what we'll be passing to the constructor
- The pause_pos will always try to substract one from the detected position (unless the result is negative, in which case it will force 0). The reason we're doing this will be more apparent in the second section part of the "pauses" section, but in summary, the call to "please check if there is a pause here" will be made AFTER the target letter is typed, so without that logic our pauses will be placed 1 letter AFTER the one we expect).
Detecting pauses
So we now have all our pauses registered in our PauseCalculator node, and now we're gonna make the Dialogue node react to these changes.
Remember that "check_at_position()" method that we left empty a while ago inside PauseCalculator.gd? Now we're gonna modify it with the following:
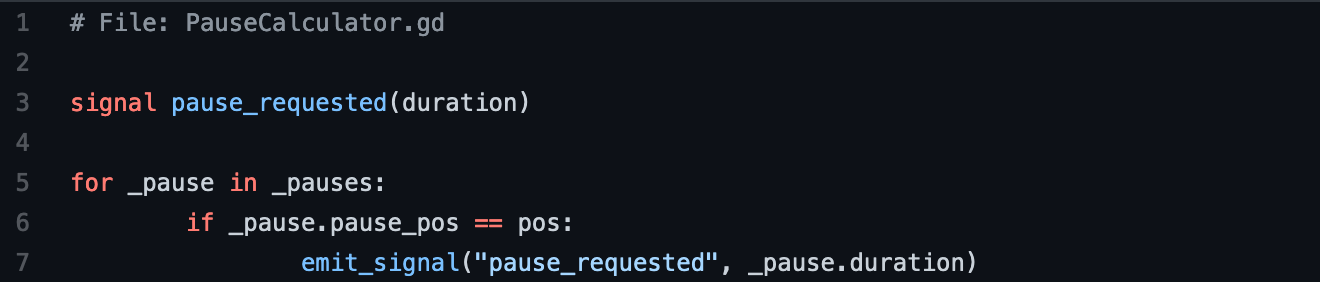
Now, on the dialogue node we're gonna add another timer called PauseTimer, and we will:
- Connect the PauseCalculator's pause_requested signal
- Connect the PauseTimer's timeout signal
The changes will be as follows:
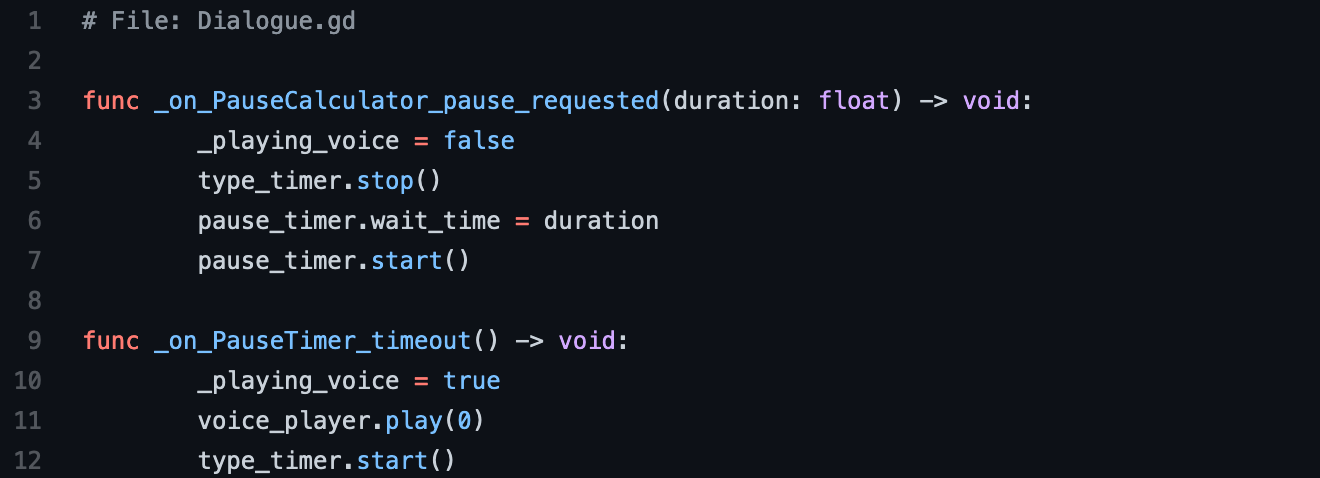
And finally' we are gonna add this line the Type timer's timeout method (it should already be there):

All right, lets gooo! We run the scene with the same string that we used at the start of this example aaand (you know by now that this means something will not work quite as expected):

Ok so...the first one works just fine, but the second one appears off? What's happening?
Well, if we take a closer look on the amount of characters it's offset by:
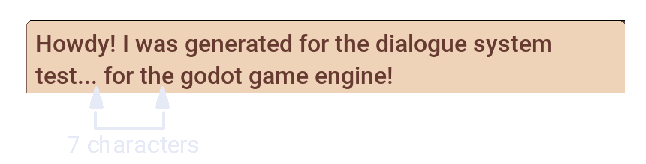
Those 7 charactes come from the previous {p=0.5}, which means that all preceding tags from the current one will affect its detected position, as the RegEx check doesn't know that there's a portion of the string it doesn't have to take into account.
To fix this, we are gonna substract the length of all the tags the service finds to the left of our current tag. First, we define the following method:
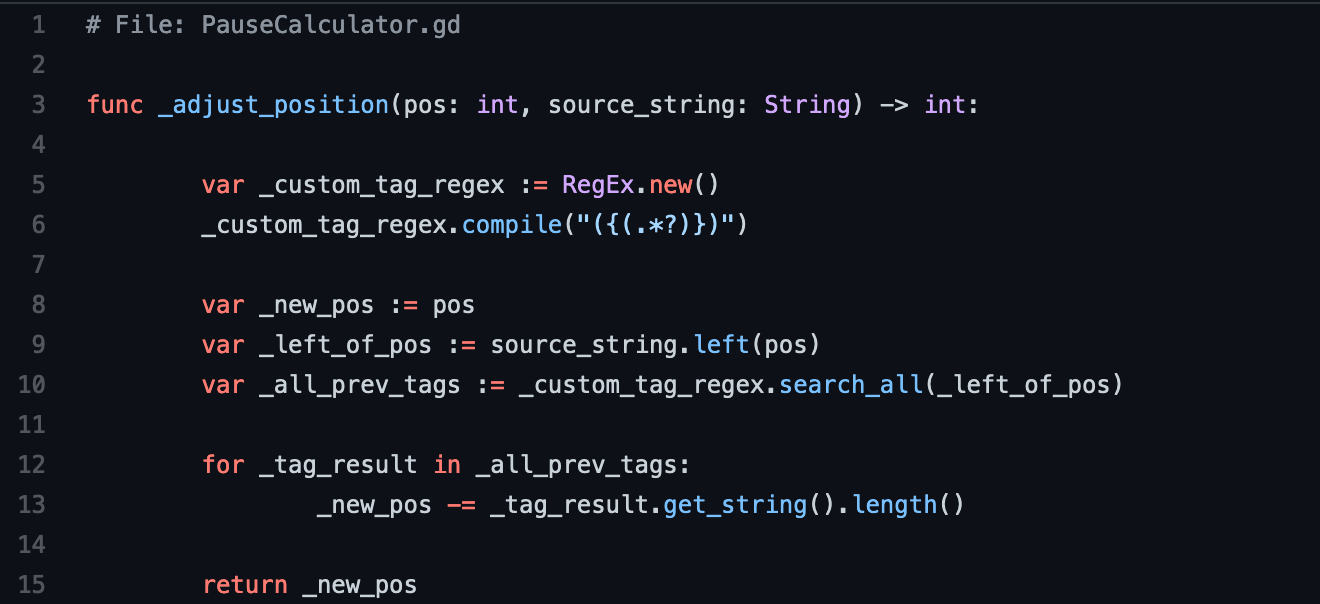
Ayyy, another regex! But this one seems familiar...
Here, we are using the same expression as on the _extract_tags method to find every single tag defined between curly braces (the {%s} tags), this way we can capture our {p=%f} tags alongside any other custom tag we want to define in the future, provided that it follows this convention.
Step by step of what's happening
- Get a substring with everything to the left of the provided tag position
- Find all custom tags in this substring
- Substract the tag's string length to the current position
And we'll use this to calculate the Pause's position, meaning that this:

Will become this:

Note: this is inside the _find_pauses method, inside PauseCalculator.gd
Run the scene again, and now you should see this:

Step 3: Making BBCode behave nicely with that we've done
Everything seems to work fine for now, but the same problem that we saw with the previous tags will happen with previous bbcode expressions, meaning that something like this:
[wave]hello[/wave]{p=0.5} I am the text!
Will detect the pause tag 13 characters after it was truly defined (the combined length of "[wave]" and "[/wave]"), defeating the whole purpose of using a RichTextLabel over a regular Label.
We're gonna fix this issue the same way as before: detect every single bbcode tag before the current tag position, and substract their length to the resulting position. Modify the "_adjust_position" method like this:
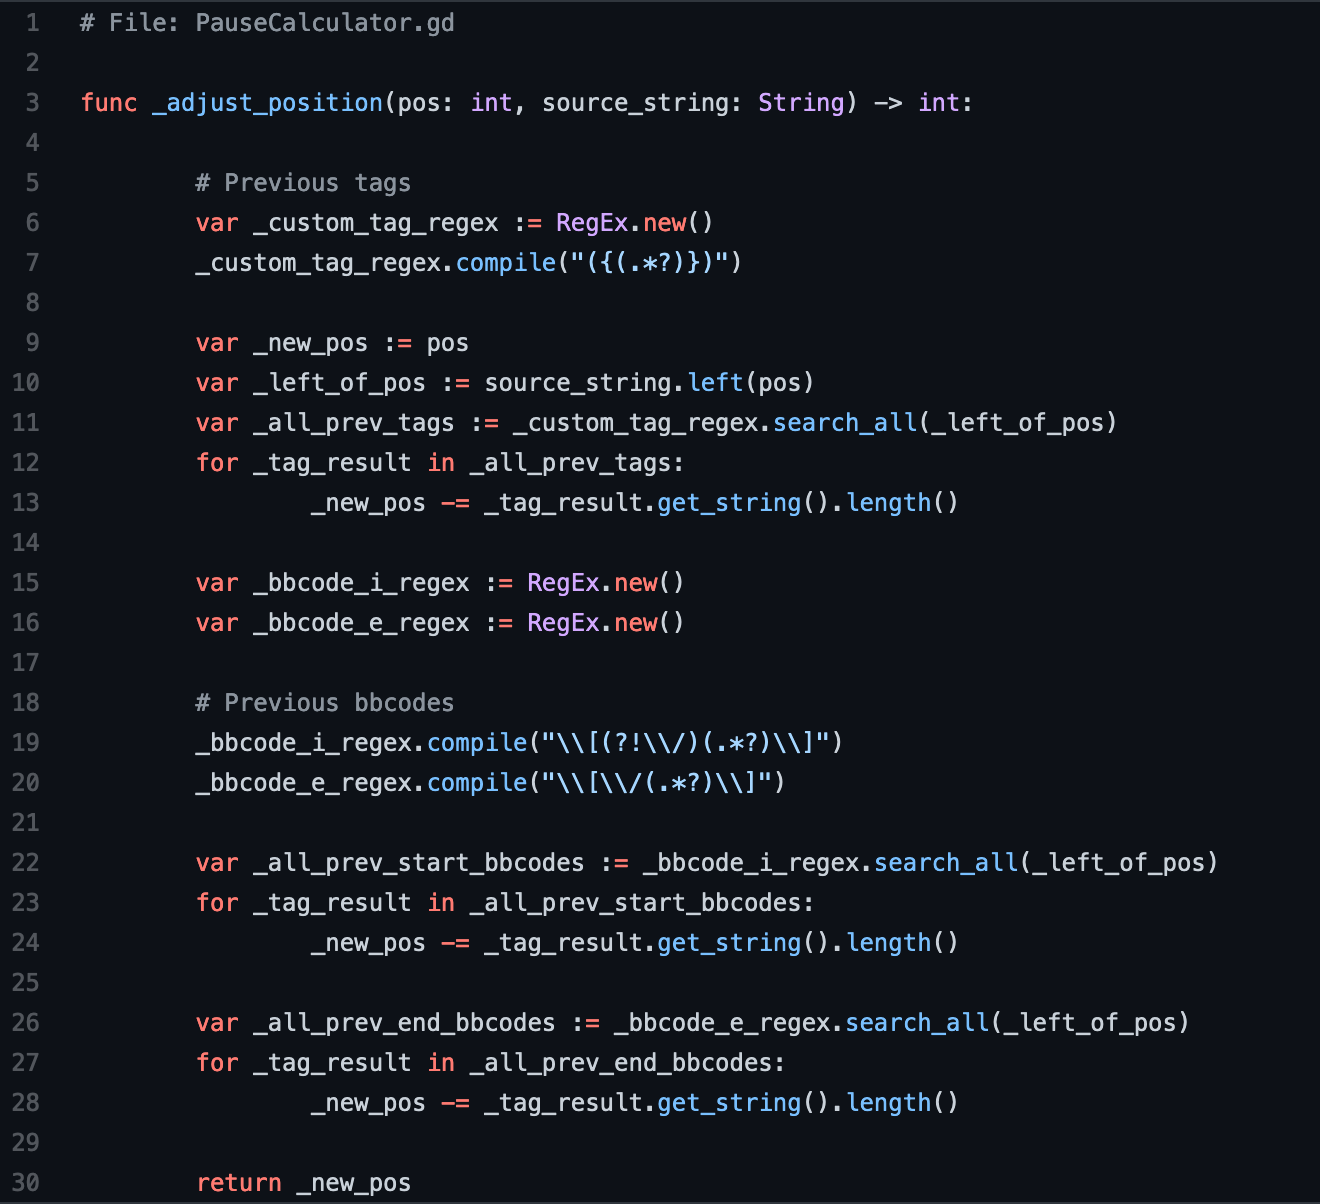
Note: Those were the best regexes I could find to detect bbcodes, but you could define your own if they don't seem to work property for you
Now, everything should work as expected!

Step 4: Conversations, and putting it all together
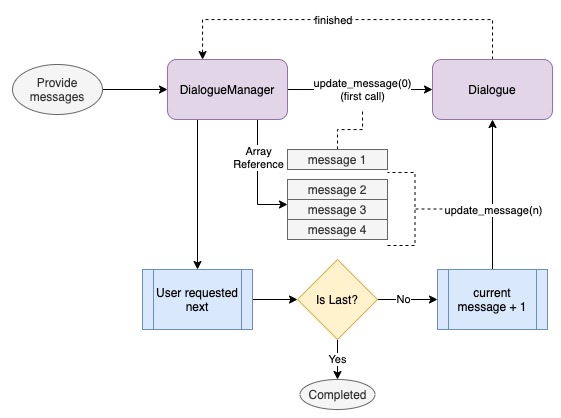
All right, we have our Dialogue node up and ready to go! now all we need is a way to coordinate multiple "messages" to simulate a conversation, and we're all set~. We'll be creating the DialogueManager class in this section.
Ok so, we're no longer gonna make the Dialogue auto-show any message, so we must delete the _ready function we've been using to force our messages when running the file as a standalone scene. Remember to do this, or else your text is gonna randomly change after the manager queues a set of messages.
Ok so let's briefly list what this node will be responsible of:
- Coordinating one or more messages to send to the previously created Dialogue node
- Detecting the user input, and allowing us to navigate to the "next" message on the array
- Adding/removing the current dialogue from the tree.
Which can be summarized with this diagram:
Let's start by creating a new Node, naming it DialogueManager and attaching this script to it:
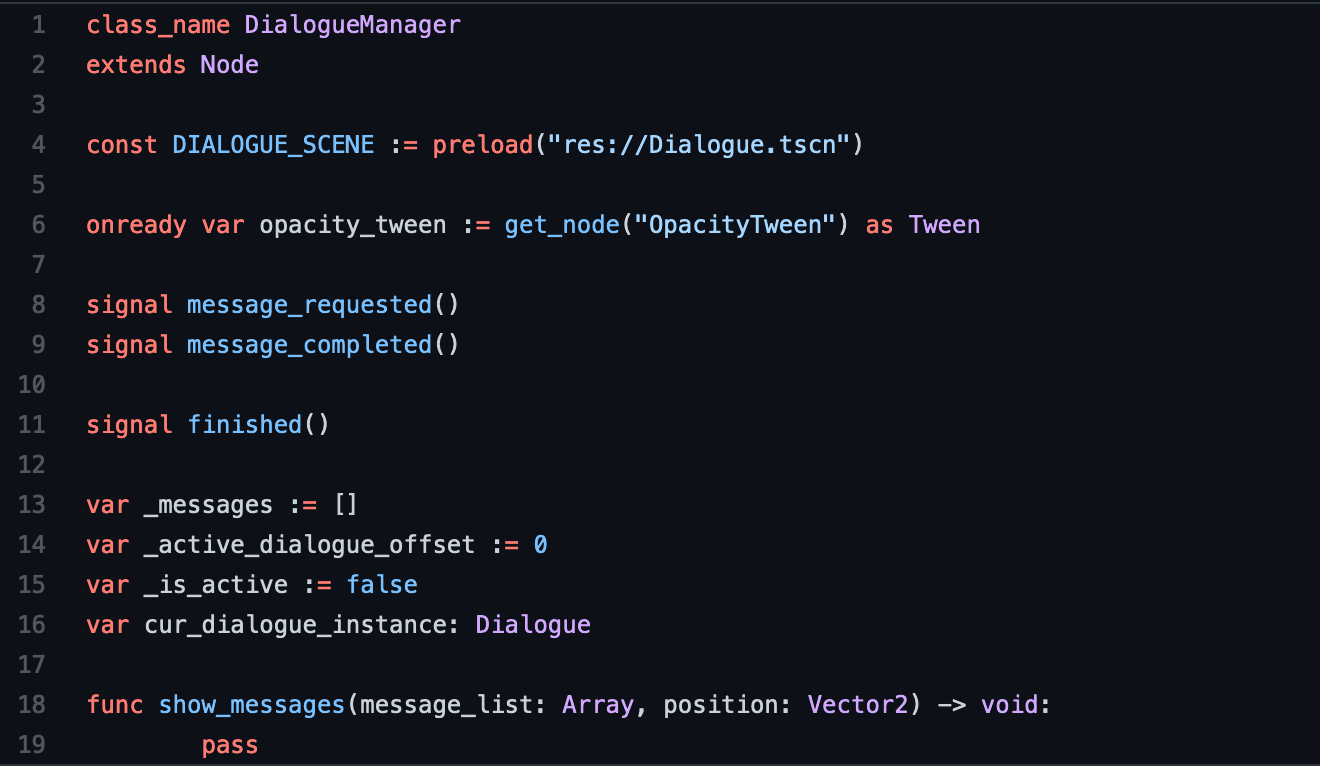
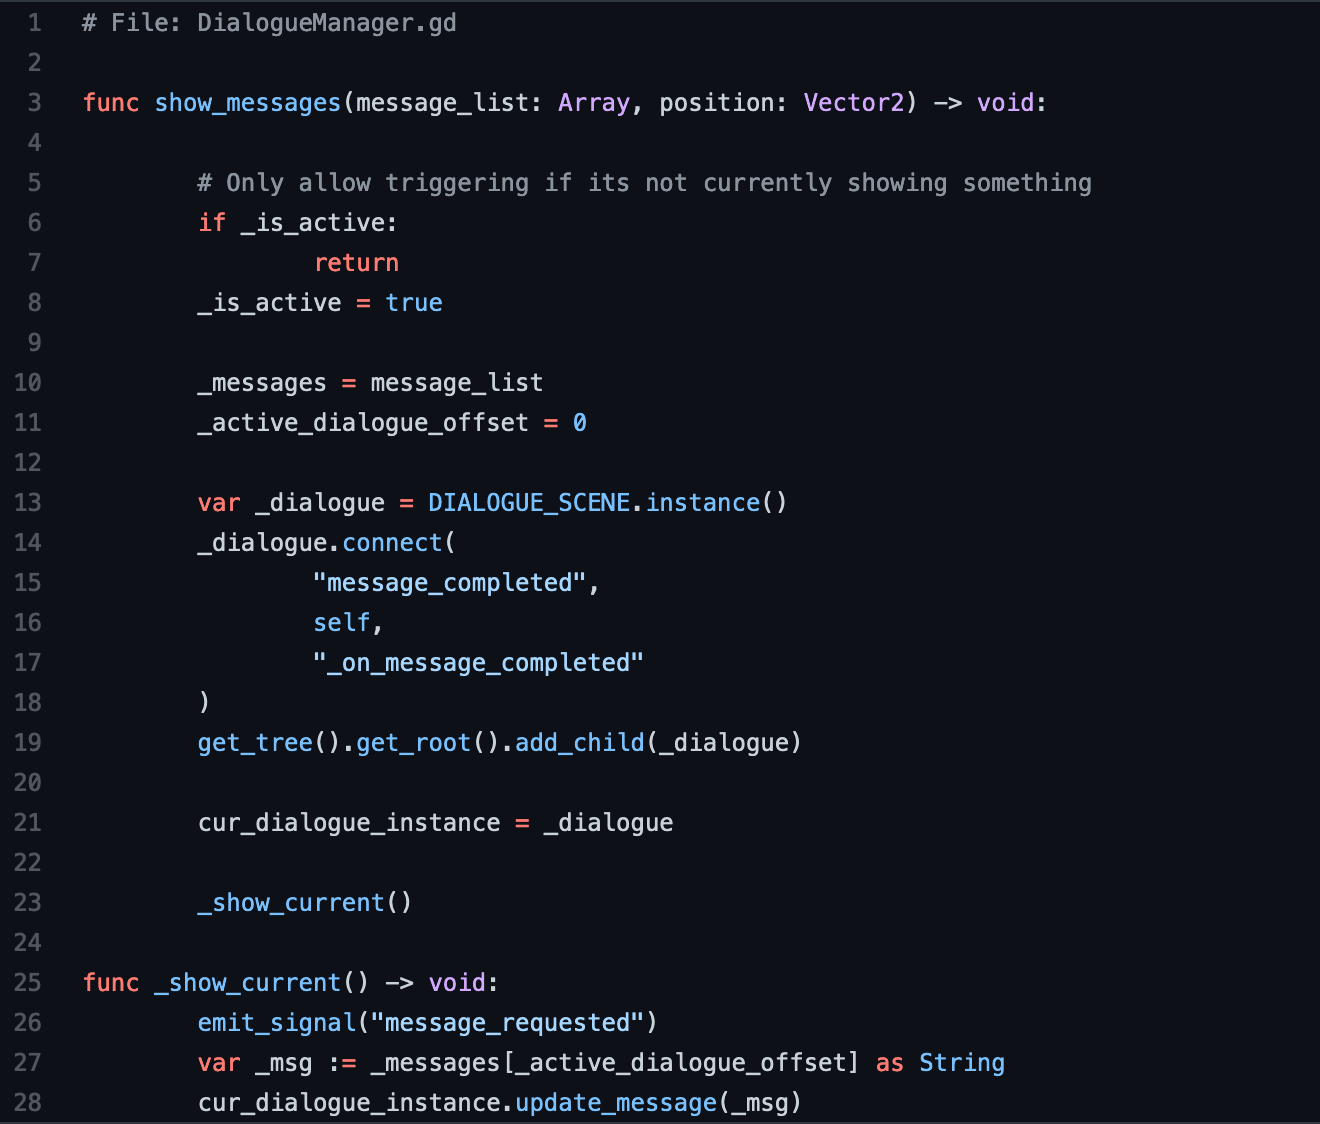
We'll use the "show_messages" method to build our conversation with multiple strings, and the position will be where the dialogue will spawn on the tree. Modify it like this:
We also need to detect when the "next" key is pressed, so we can update _active_dialogue_offset and call _show_current again. This is the logic I could quickly come up with to detect when the "enter" key is pressed:
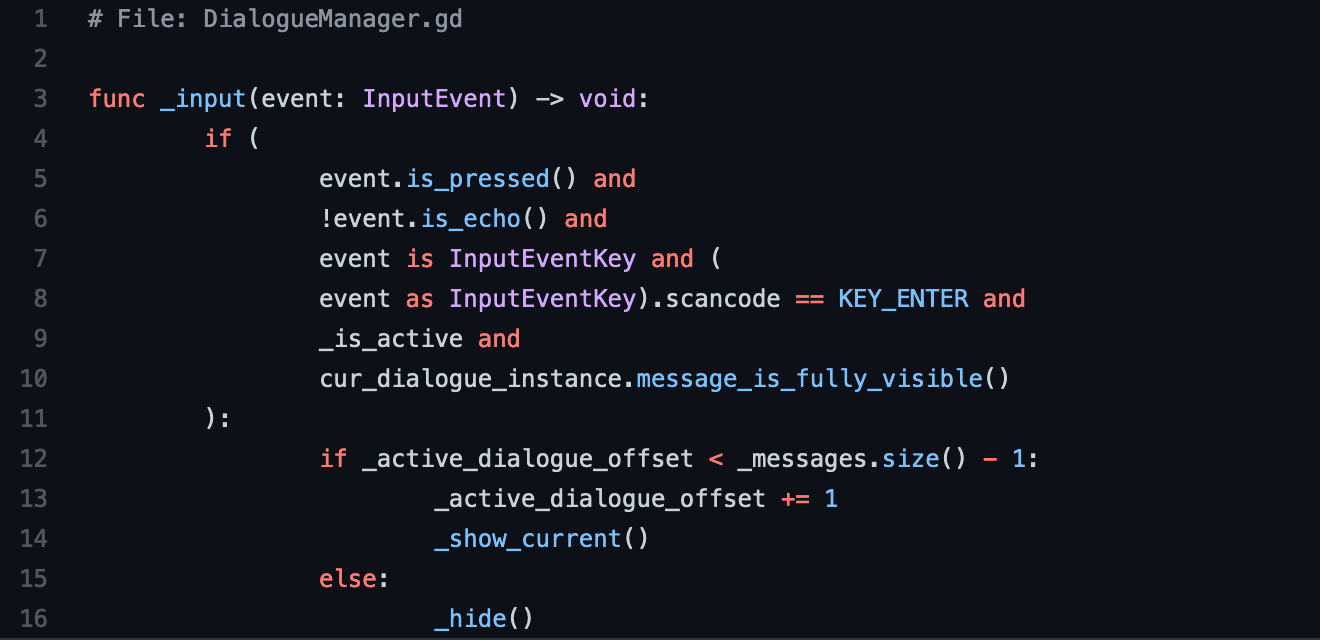
Kinda dirty, but it will have to do for now. Note that we added a "message_is_fully_visible()" method to the Dialogue node, which just compares if the number of visible characters match the max amount on the string.
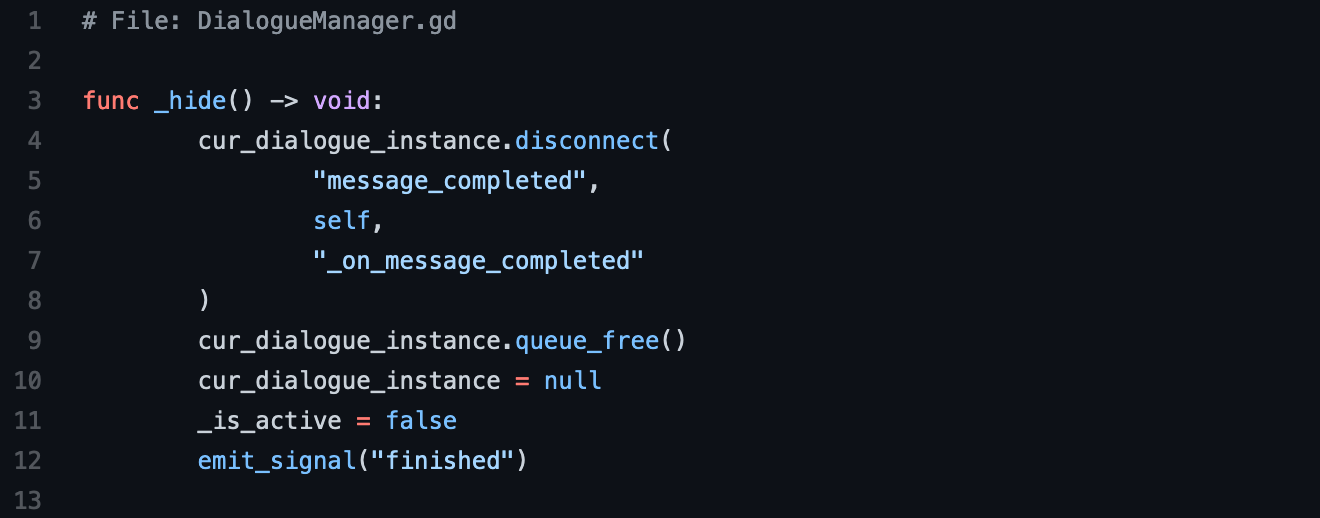
Additionally, we're gonna define a "_hide()" method that will just remove the Dialogue from the tree, and notify that the conversation finished:
And finally, we add the last method we connected to on the "show_messages()" method will just emit the "message_completed" signal, that way we know when we can show/hide the "press enter" prompt:

Final Step: Hooking it up to the main scene
We're almost done with our sample project, the last thing we must do is hook it up inside a test scene, and fire some dialogues!
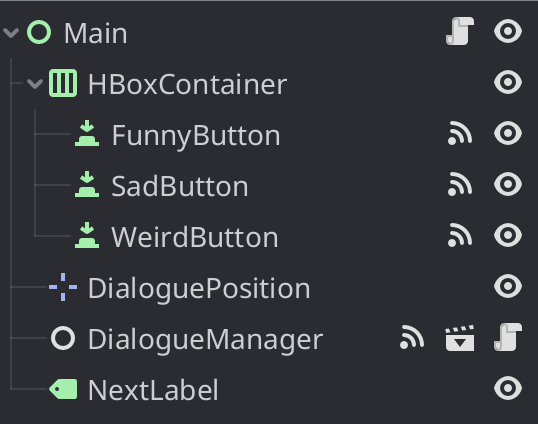
We're just gonna create a scene with the following elements, just to showcase what the Dialogue/DialogueManager combo is capable of:
- Three buttons, each one triggering a different dialogue
- A Position2D node that will tell the manager where the dialogue should appear
- A label that will be shown/hidden, depending on when the player can press enter to go to the next message
- An instance to the DialogueManager
Each button will call "dialogue_manager.show_message()" with different parameters, but using basically the same logic, This is a code example on the dialogue that we showed as the "What we'll be building" gif at the beginning of this tutorial
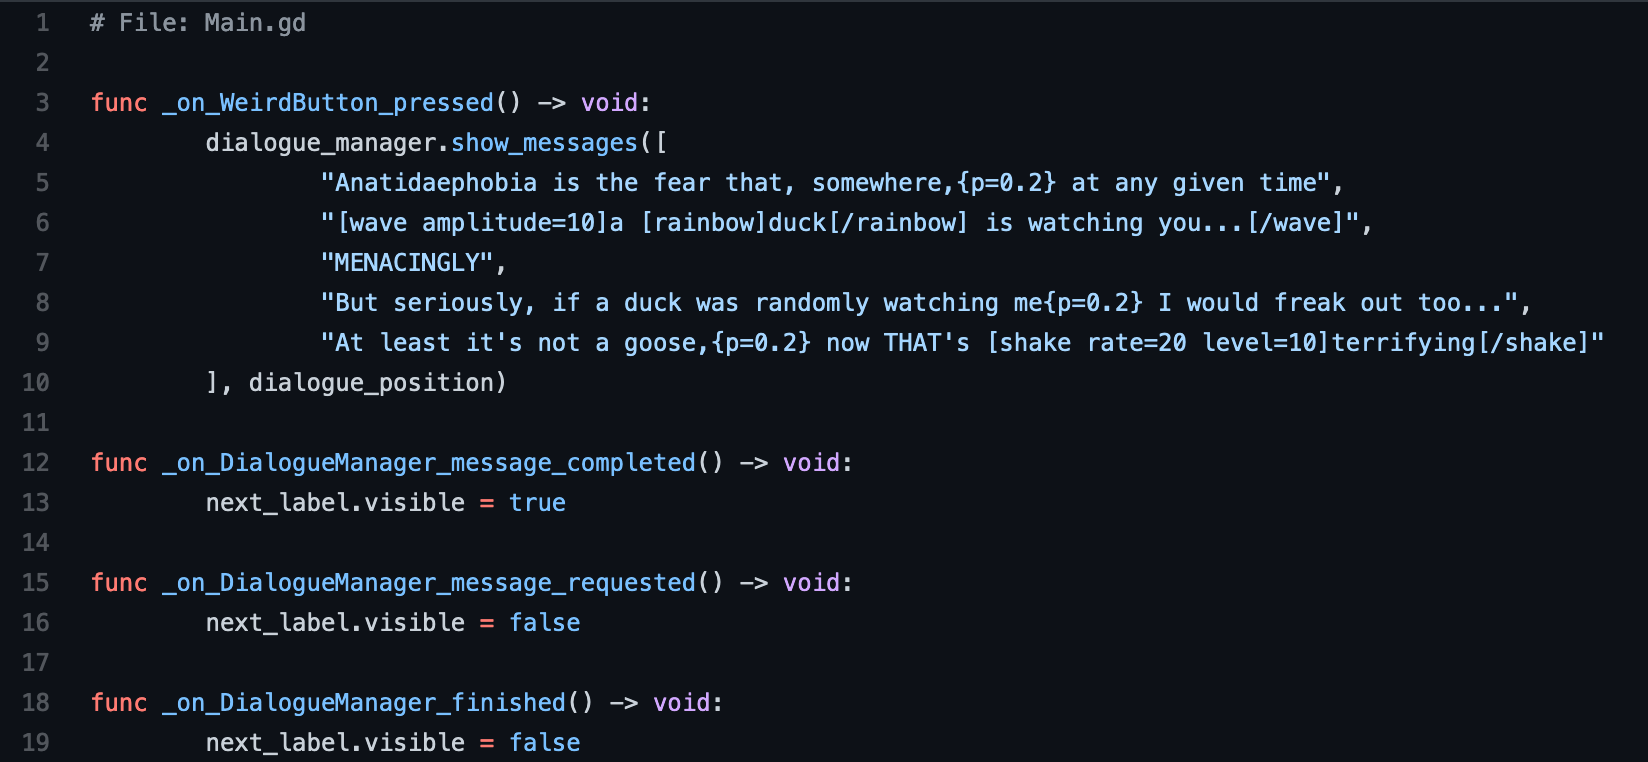
The last three methods are just signals emitted by the manager, that we will listen to in order to show/hide the "next_label" reference.
Yeah boi, we've come full circle!!
And with that, the project is done 🙏 (in that clip, the dialogue fades in and out rather than popping in and out of existence. I won't be covering that part specifically, but it's a rather simple transformation via the Tween node animating the "modulate.a" property).
Final Notes
Phew! That's quite a lot of information. Obviously this is not necessarily the only way to do this (or the best for that matter), but it's the solution we came up with, and it has worked very well for us so far. Now, there's a lot of things you could expand this project with, such as:
- Controlling not just pauses, but also different typing speeds (another custom tag maybe?).
- Text alone is a bit boring, you could add an image to each message! of course, it can't be just a string anymore...
- Choices and branching dialogues (WAY out of the scope of this tutorial, I'll just leave the cards on the table 👀).
Well, hope you could find something useful in this tutorial, or at least learn something new (I know I sure did writing this post).
Again, here's the link to the github repo, in case you want to actually see the code and run it for yourself.
And we can't end this blog post without reminding you of OUR INDIEGOGO PRELAUNCH PAGE!!!!!!!!!!
Go sign up NOW! or the geese will get you
Hope to see you soon in our following posts!
Comments
Log in with itch.io to leave a comment.
Commenting on this 4 years later is kind of silly, I know. Intuitively, the test scene lays a decent groundwork for branching dialogue by having different buttons play different lines of dialogue. However, would having this decision scene actually work? As in, assuming you wish to use the same box to display your options, would it be better to handle option selection on the dialogue manager rather than the scene you place the dialogue manager in?
my god i would love a tutorial on the branching dialog system 👀 please pick up the cards and use em. Regardless this was super helpful, thank you!
Excellent write up. Thank you so much!
Thanks, I was able to use this and transition it to Godot 4.0 fairly comfortably, super helpful!
Something that is fairly re-usable too across other projects so bless you're heads!
Can't express how much this has helped me. I was ripping my hair out trying to figure out how to add pauses and bbcode to a typewriting effect so seeing this post was like seeing an angel.
I wanted to implement dialogue boxes in a jam game for the first time and this tutorial was a godsend, thank you! However, having followed it nearly all the way through, there were a fair amount of discrepancies in the writing/screenshots. Here are some of the things that weren't clear to me, lest they help others debug:
Hi, glad it was useful!
Ah, you're right, since I was posting partial code snippets instead of the whole script on the steps, there were some details that I either mistyped or simply forgot to put on the screenshot.
Thanks for pointing it out! I'm gonna try to correct the screenshots so they follow the example project more closely.
No problem! Thanks for taking the time to put this up :). I couldn't find any other tutorials on dialogue boxes with pausing, sound, and scrolling for Godot. I guess a lot of people are just using Dialogic.
I still haven't checked it, but how does it handle text overflow(when the dialog/text is too long)?
Hello! for this tutorial, the text is trimmed after 3 lines, didn't want to add more complexity to it but I'm sure that a simple scrolling logic can be added to the rich text label if you need to.
Cheers~
I implemented this in Godot, and it automatically added a scrollbar to the dialogue box.
this looks really great, and perfect timing too. I'm currently working on a dialogue system myself.
Very nice tutorial. Thank you so much!
Amazing... maybe you could turn this into a Godot asset
Great tutorial, thanks!
Thank you for this great tutorial. I wish you the best for your Indiegogo campaign !
holy shit that's alot of words but might be important for developer like me so time to grind :(