Bittersweet Birthday
HowTo: Painless Translations in Godot
Yo, what's up! We've been a bit busy lately with the ongoing campaign, but we figured it's about time we made another HowTo post, this time:
TRANSLATIONS!! (cue the fanfare)
Now, I'm gonna do a quick shameless plug here reminding you that our campaign is live, and you can go donate/share the project with friends, family (heck, even with your dog, everything helps!!)

Ok, ok, I know that seems a bit off topic with the "translations" theme, but hear me out: I'm bringing up the campaign because we did a whole-ass SPANISH translation before launching it (like, literally a week or two before), and I wanted to talk about how we did it. I'm going to cover the following:
- Managing an internal configuration state for translations.
- Using the build-in CSV loader to translate UI elements.
- Using the current locale to load different conversations (more on why they are handled differently than the rest of the UI in a bit).
Before we start I wanted to say that we're taking full advantage of Godot's translation API, a powerful system which automatically replaces placeholder strings with their "translated" version. I'll explain the steps we took to implement this system, but their documentation is pretty solid as well if you want to check it out.
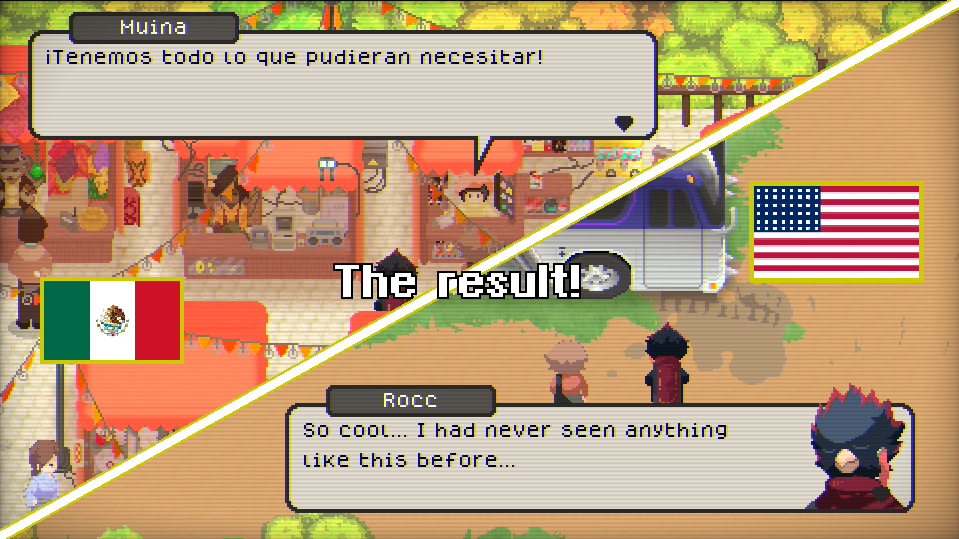
In the end, we'll be making a system that allows you to do something like this:
I'll also gloss over our dialogue system, as it is a bit related, but you don't need to know the full implementation to get a good grasp on what we're doing here. Still, if you wanna read a bit more on that topic, we did a devlog on that as well~
And just as with all my previous devlogs:
- I'll be using typed gdscript
- Code snippets will be shown as images, but clicking them should take you to a gist, where you can copy&paste the content directly.
- The final project is available on this repo.
So, without further ado, let's get started!
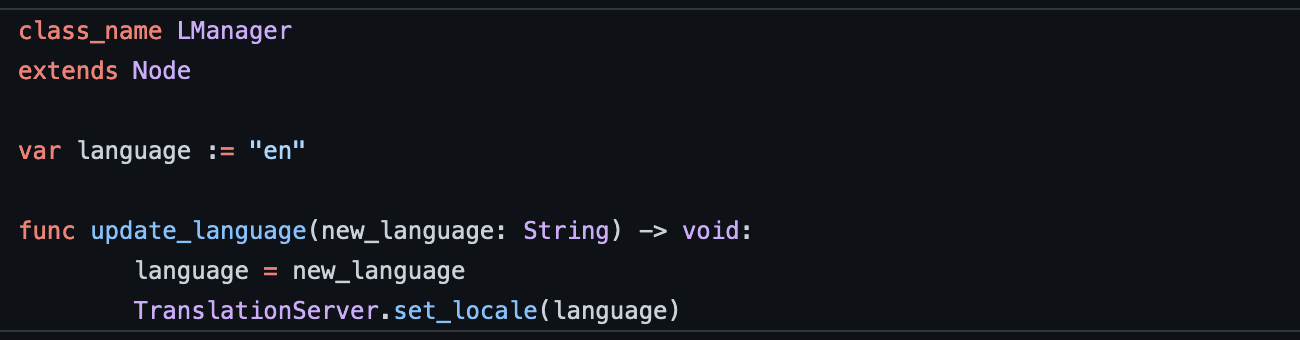
Managing the Translation State
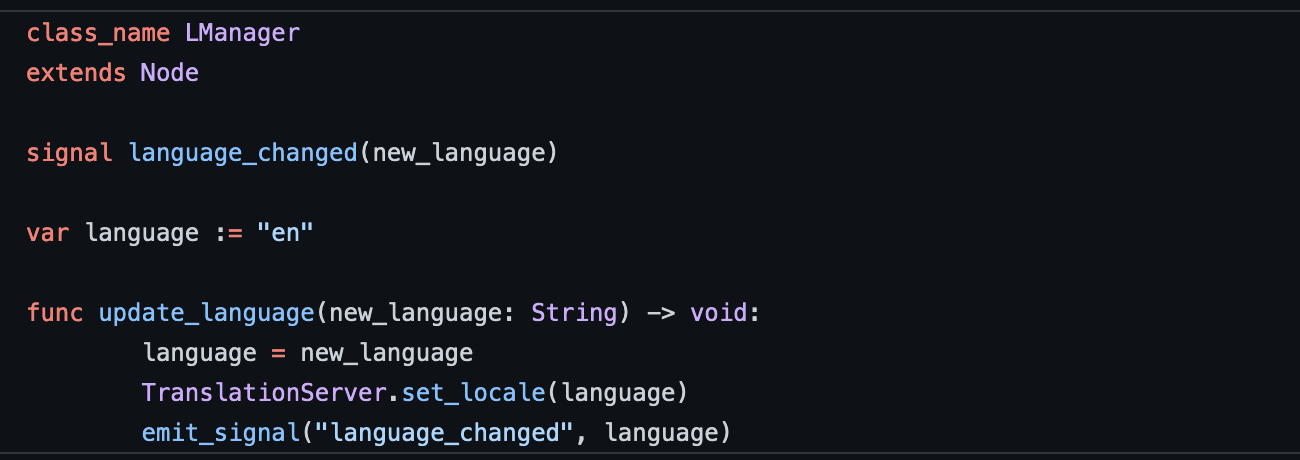
This part is simple enough: we'll create a singleton that manages which language is selected, and will propagate that change to Godot's internal TranslationServer.
Easy enough, right?
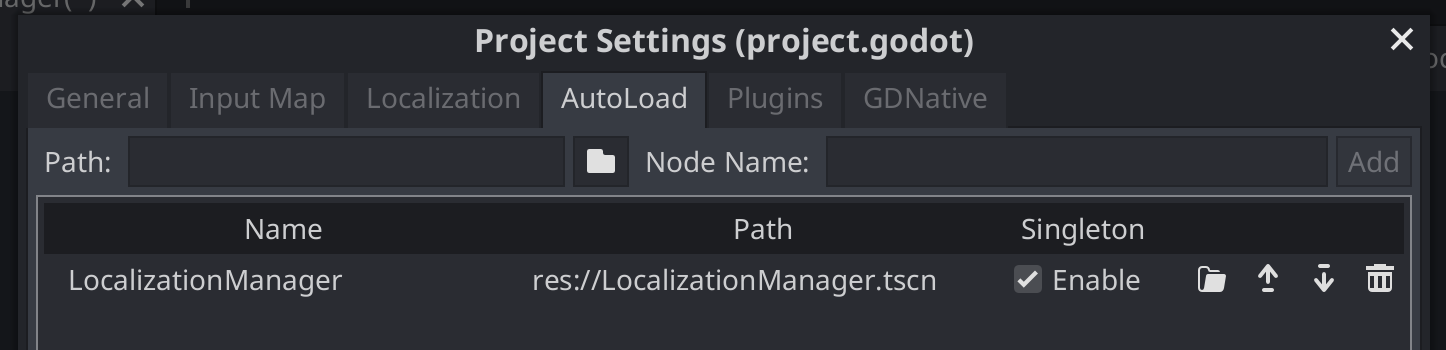
Next, we'll add it to the project's autoload resources:
And to finalize the initial configuration, I'm gonna create a mock control scene with 2 buttons, each one will force the localization to a different language. Here's the scene, and it's attached script:

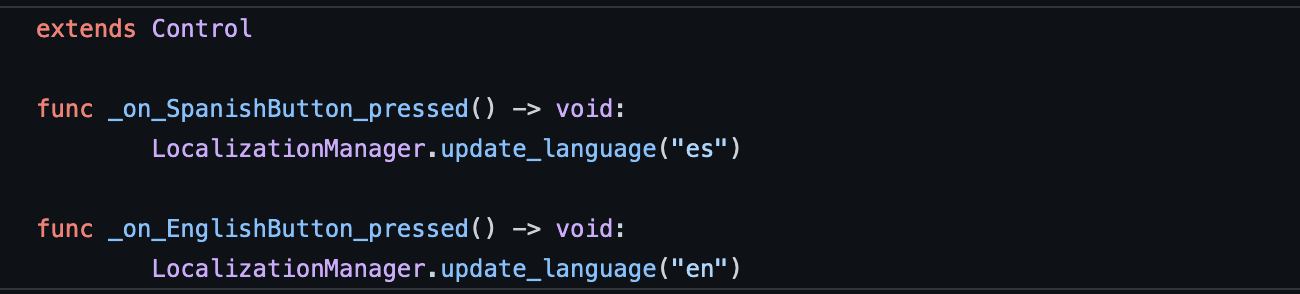
And that's it for step 1!! All of these was just setup, running the project will just show the 2 buttons on the screen, and pressing them will update the current language server, but nothing will be actually visible for now.
For that, let's jump to step 2.
Localization with CSV files
Now for the fun part, let's translate a couple of UI elements!!
Before I start this part, I'll just say that it will be really similar to Godot's official documentation regarding translation files, I'll just add a bit of explanation to some steps, and probably give some personal recommendations (Note: PERSONAL recommendations, whether they are good or not is up to you 😉).
So, first part of this step will be to create the sources for the translated strings, which is where the CSV files come into play.
CSV stands for "Comma Separated Values", and they are just a simple two-dimensional data structure that can be read and modified by several different programs, almost all of which treat them as spreadsheets (they are NOT spreadsheets, however).
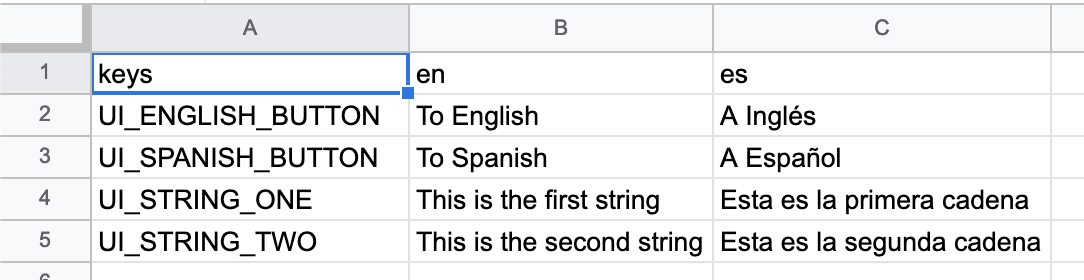
Let's create a CSV file with the following structure:
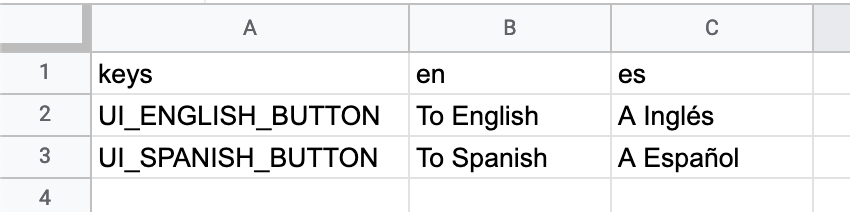
The first cell (identified by "keys") will tell Godot that every element defined for this column is the main string identifier, which we will use inside the game instead of the actual string. Each subsequent column starts with a language identifier ("en" and "es" in this case), and every entry below that identifier represents what the final string for the provided key in a given language will be rendered.
Note: It's always recommended to use strings that will not appear ANYWHERE else in your UI for the keys, hence why I'm using all-caps AND underscores. This helps in both keeping track of what translated strings are available, and prevents the keys from colliding with the rest of the game's code.
To define an additional supported language, just add another column with the language identifier, and start translating away (note that the language identifiers must comply with Godot's supported locales).
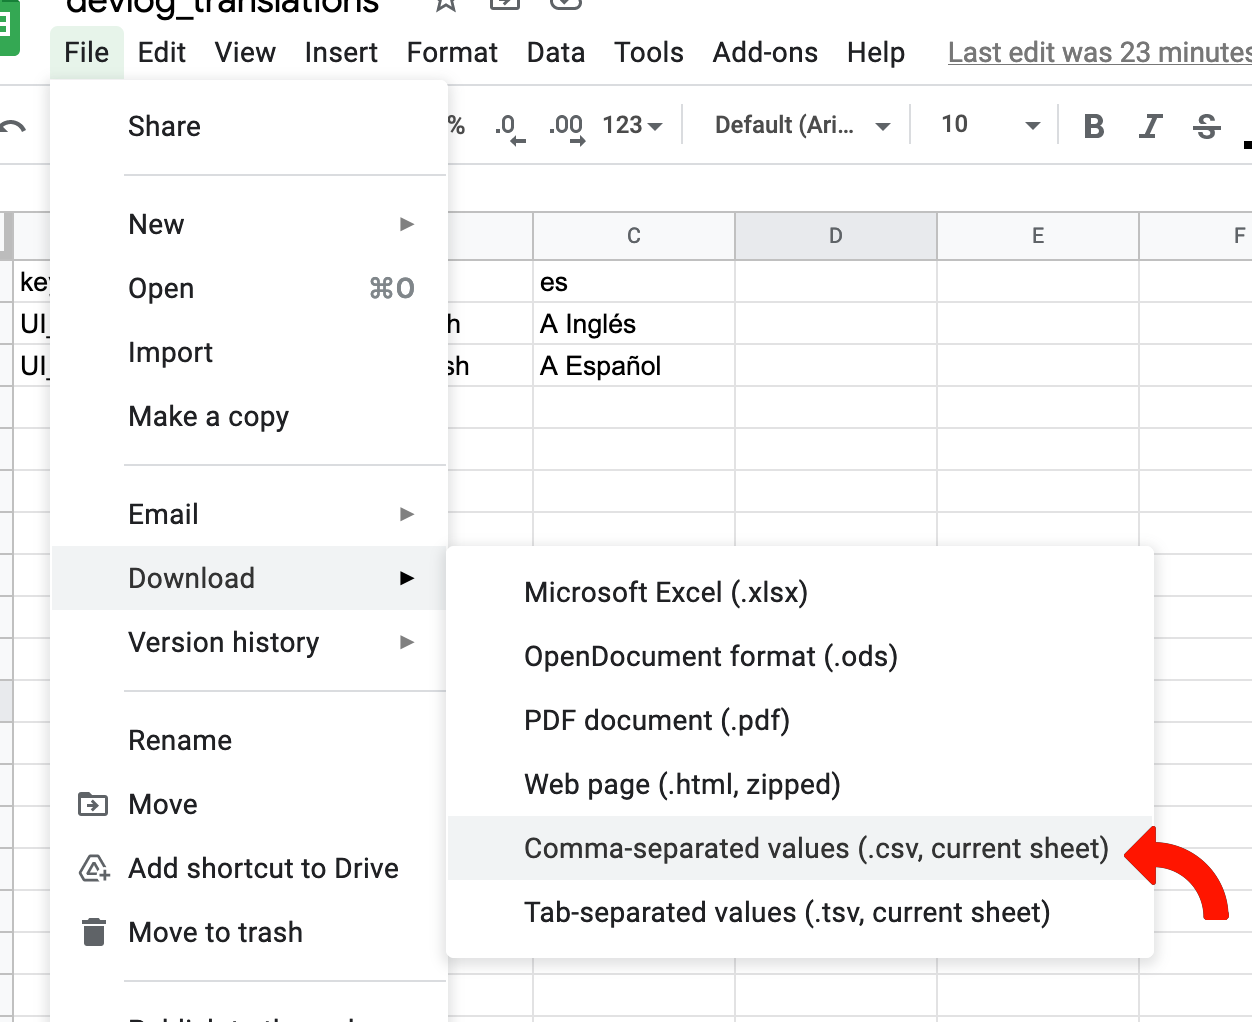
Now, download them as comma separated values (I'll name it translations.csv, but it can be whatever you want):
Add it to your project, and let Godot handle the auto-importing process (just as it does with any kind of resources like images, for example). Now, after they are detected and imported, you should have 4 files related to your csv file:
- Your original translations.csv file
- A translations.csv.import file
- A translations.es.translation file
- A translations.en.translation file
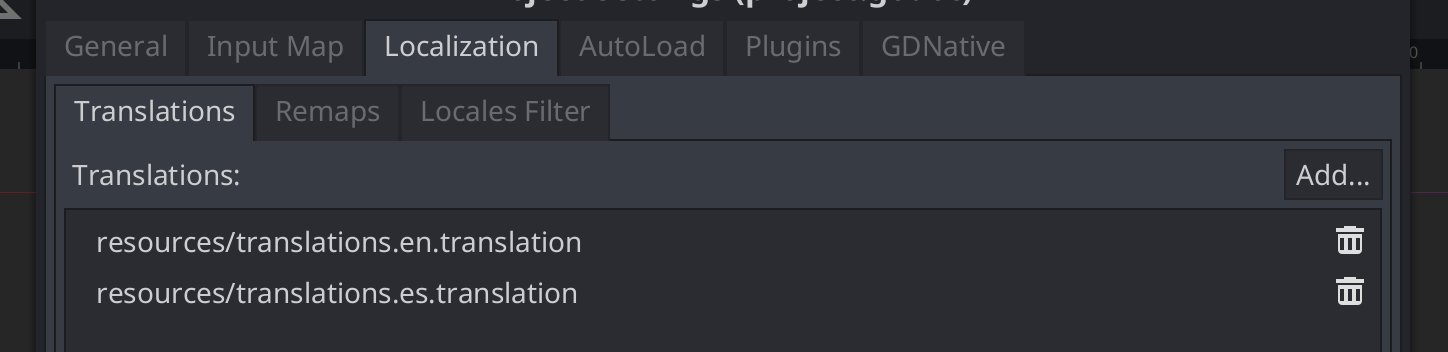
We're interested in the last two: translations.es.translation and translation.en.translation. Open the project settings, and add both of them to the localization tab:
And now, we need to update our UI components to reflect the translated value. Thankfully, Godot offers two ways of doing this:
- Control elements that display texts (such as buttons, labels, etc) actively listen to the TranslationServer's locale change, and will try to match it's internal text content to a "key" in any the registered csv files and will display the translated text (basically, "automatic" update)
- There's a global method called "tr", which accepts a sting as an argument which it will use as the "key" to look for in the registered csv files, and will return the translated string as a result (basically, "manual" update).
I want to demonstrate both approaches to highlight their differences, so I'll add two additional labels to the project, and I'll also add two additional entries to the original csv:
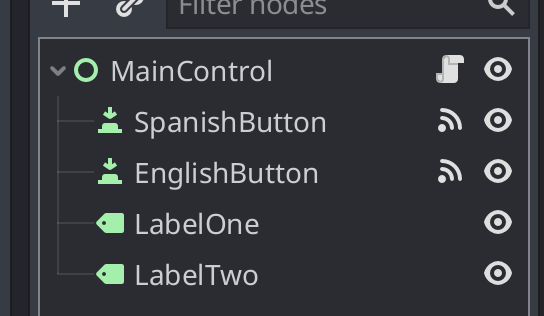
Now, do the following:
- Update the text property on "SpanishButton" to "UI_SPANISH_BUTTON".
- Update the text property on "EnglishButton" to "UI_ENGLISH_BUTTON"
- Update the text property on "LabelOne" to "UI_STRING_ONE".
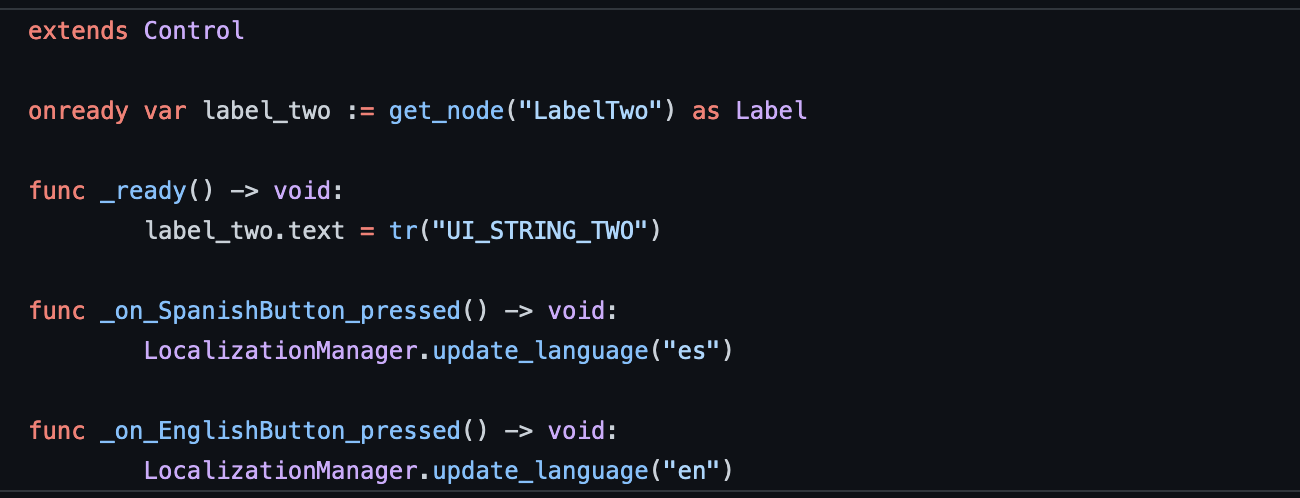
- We'll use tr for the second label, so update the main control's script to the following implementation:
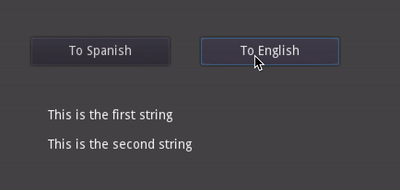
Now, running the project should display the following:
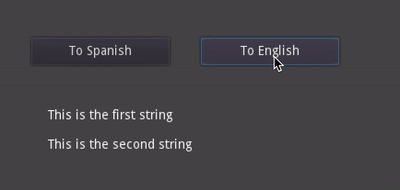
You'll notice that everything translates nicely, EXCEPT for the second label. This is because the label's text property is being set to an already translated string, rather than the key, so it can't automatically update when the language server changes (the reference to the original key is lost after the "tr" method is invoked).
Now there's no real reason to NOT set the second label's content to the translation key, but I did it just to demonstrate this small gotcha that can pop up when first trying out the translations.
Now, as of writing this devlog, I couldn't find a signal emitted by the TranslationServer when the locale changed, and going through the Notification route is a bit cumbersome, so in the end I decided to just add my own signal to the LocalizationManager singleton, as such:
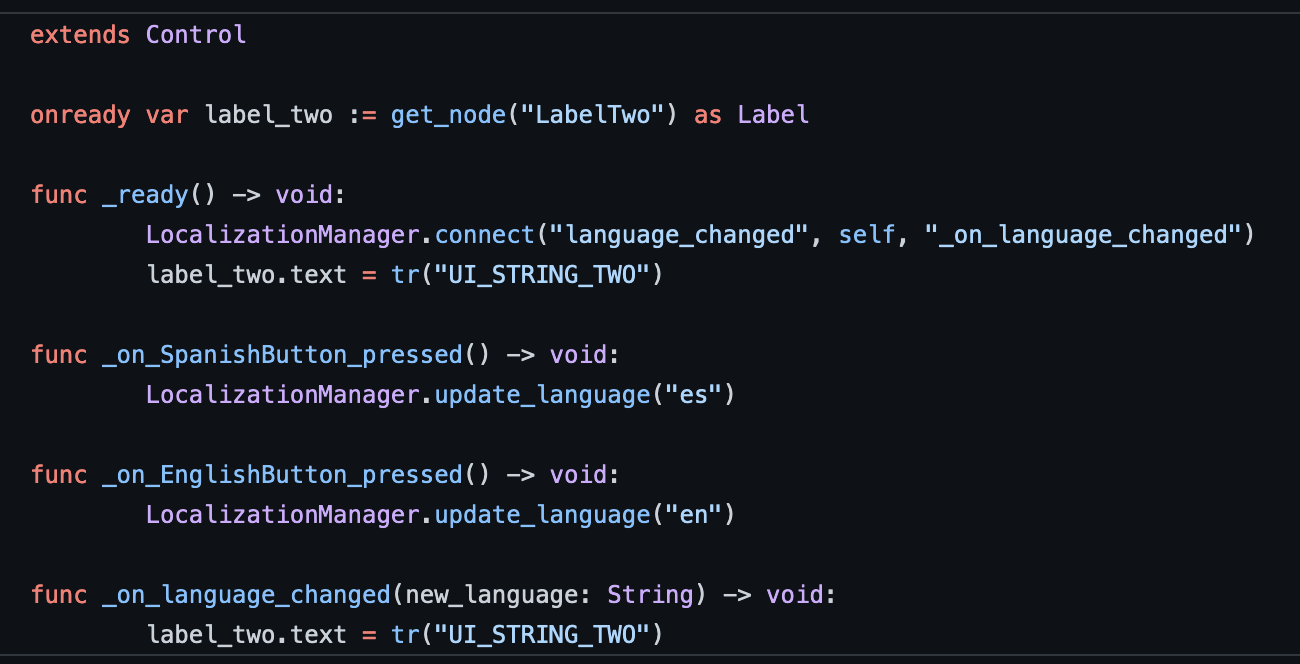
And with this small change, everything should be working as expected:
Hooking up our dialogues
So, if you remember our previous HowTo devlog, we handle dialogues a bit differently than the rest of the UI, mainly due to the fact that they must also include behavior (as in, voice and typing behavior) in addition to content. The gist of that system is basically this:
- We define two "entities" when dealing with dialogues: Conversations and Messages.
- A conversations contain a list of messages, and is identified by a "string" inside a JSON file.
- A message contains the string that will be typed, alongside some additional information such as typing speed, voices, options, etc.
- Each message will be displayed in a separate text bubble.
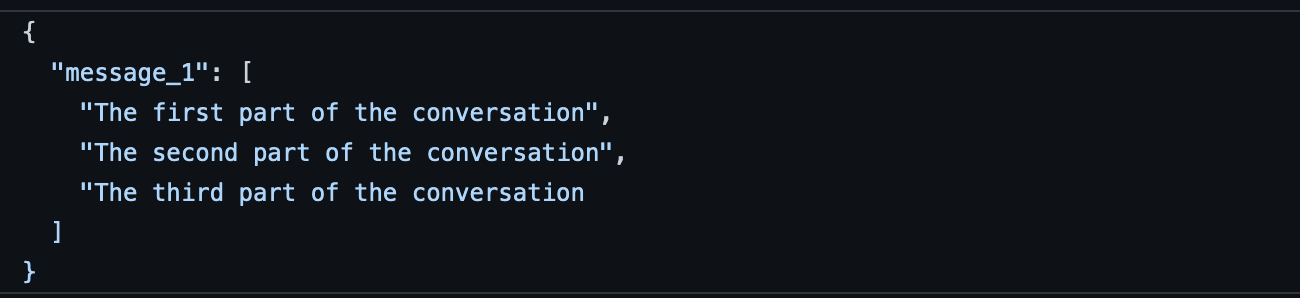
This is a quick example on how a dialogue JSON file that has one conversation called "message_1" could look:
Now, we could technically extract those 3 messages to the csv file, and just add something like DIALOGUE_MESSAGE_1, DIALOGUE_MESSAGE_2, etc to the array (as they will ultimately end up inside a RichTextLabel), but there's one BIG caveat on doing things this way:
Conversations don't always match perfectly between different languages.
Sometimes, to maintain a natural "feel" for a conversation, the same conversation needs to be broken in different message quantities, else they are at risk of feeling like a lousy google translate job. A quick example I can think of off the top of my head is this:

A surprise, to be sure, but a welcome (?) one
Both of these variants convey basically the same overall message, but to correctly deliver the "suspense" feeling, each word was separated into it's own message (as in, each one will appear on a standalone speech bubble), and since the Spanish version has more words, the "surprised" conversation no longer has a 1 to 1 match.
So, to work around this, we'll use different JSON files depending on the current language.
Quick side note: as much as I would like to delve into how we display dialogues here, I've already covered a considerable part of that process in the previous devlog, so I'll refrain from explaining it here and just focus on knowing which json needs to be loaded.
So, remember that we declared a "language" property like, a MILLION years ago? (actually at the beginning of this devlog, but still)

Well, we're ACTUALLY gonna use it 🎉🎉🎉 (yay, it's no longer irrelevant code)
What we'll do is we're gonna create a folder called "dialogues" inside our project, and create a folder for each language our game supports. The "root" of the dialogues folder will have the JSON files corresponding to the english translation, while every other language will have it's own folder, named after the localization identifier.
I'm treating the english versions this way due to 2 main reasons:
- Our game was first developed in english (as I guess the majority of the games are on their first draft), so JSON files were not separated into different languages by that point.
- Doing it this way makes it easier to just fall back to english in case a specific dialogue file is not found for a language.
So, I'll add this piece of code to LocalizationManager.gd:

A quick breakdown of what's happening here:
- I've defined the "resources/dialogues" folder as the root folder for all of our dialogues.
- When requesting the full path for a dialogue, we provide the name to this function,
- If a dialogue matching the provided name is found inside a language folder named after the current language, return it.
- If not, return the default dialogue path (which should point to the English version).
So knowing this, and having this directory structure:

Asking for the "dialogue.json" file in spanish will return what's located inside the "es" folder, while doing so for any other language (including english) will return the file located directly in the "dialogues" folder.
Now, all that's left is to feed that json path to the
🙌🙌🔥🔥 Dialogue processing overlords 🔥🔥🙌🙌
So, to wrap it up
This was basically a quick overview on what we had to do to translate the game, but Godot offers WAY more capabilities regarding translations that I didn't cover here, things such as:
- Enabling/disabling auto-localization for control nodes
- Localizing things other than strings (wanna have your intro song in Swedish? There's an image that has some text that needs to be translated? Godot's got you covered)
- Localize strings with files other than csv.
- And a lot more that I'm probably missing...
Localization can be both a monumental chore AND a huge monetary investment, but it allows you to reach a substantially wider audience and that alone makes it worth considering for any project.
Now, I would just recommend one final thing: keep everything organized, track your localized resources and make sure the translation process is well defined; unorganized resources can potentially double (or triple) the workload that this process requires...
Well, to anyone who scrolled this far down, thank you so much for reading this devlog!, it was quite an interesting experiment to fully translate the demo (specially since it has like 13,000 words), but I'm very happy on how it turned out~
And with that, I bid you farewell.
Don't forget to check the campaign if you haven't 😁.

Comments
Log in with itch.io to leave a comment.
I keep looking at your devlogs to improve an event manager built as dialog plugin
Good work! So are you opening for other languages now?
Thanks so much for all the tutorials, it helps a lot!
Excellent work on the localization process! It is a lot of effort, but it is so worth it. <3